Low Cost & Found: A/C Cover From a Bed Frame

Someone recently informed me that it’s now fall… Exsqueeze me while I screech this record player to a halt. What the heck happened to summer soirees and pool days? Fall is beautiful and all, but it’s the start of a mad dash to finish our outdoor projects before the cold sets in. Perhaps you can relate – unless you’re in LA and have nothing but time and good weather, in which case, why rush? Next week we’re hoping to stain the deck (weather permitting), and when we do we’ll also stain this sweet A/C cover Eli made a couple months ago.

How to build an AC cover from wood bed frame slats

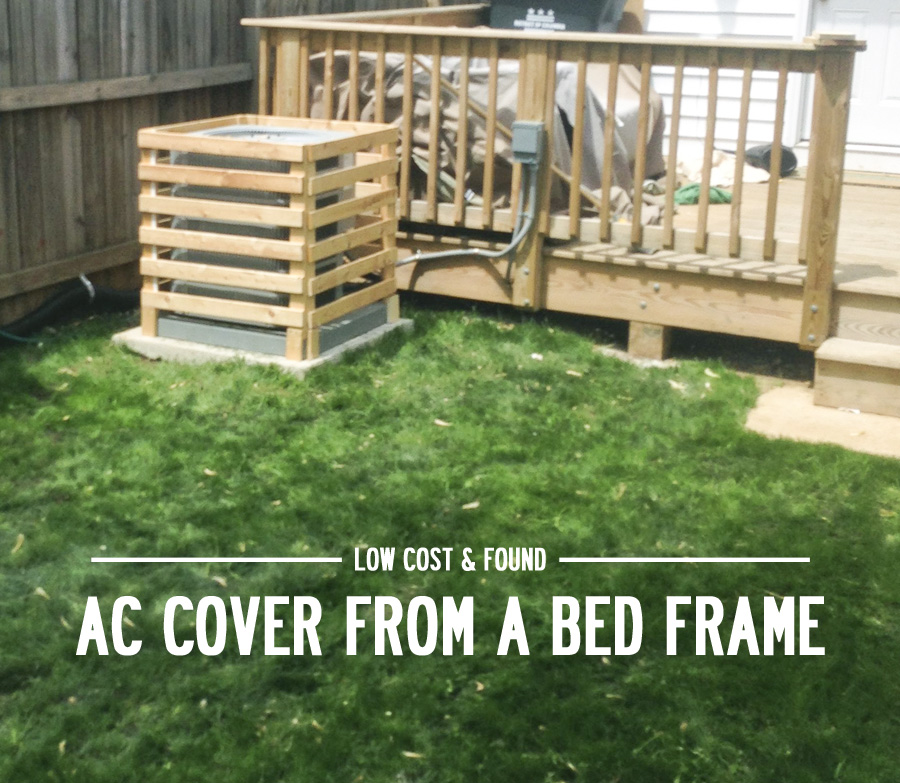
[Let's all just pretend we don't see the mess on the porch – mkay? Avert your eyes to the AC cover and that soft billowy grass! Don't you just wanna curl up and take a nap in that meadow?]

I usually play the role of DIY aficionado in our house, but Eli takes the reins every once in a while to show me what’s up. To be honest, I don’ hate it. One day when I was out of town he repurposed the wooden slats from our bed frame into a cover for the eyesore that is our A/C unit. You may remember that we converted our West Elm platform bed to hold a boxspring and no longer needed the slats that came with it. Rather than throw them out, he came up with this quick, easy & environmentally responsible DIY. Good work, Eli! What's even better is that all he used was a drill & some wood screws.

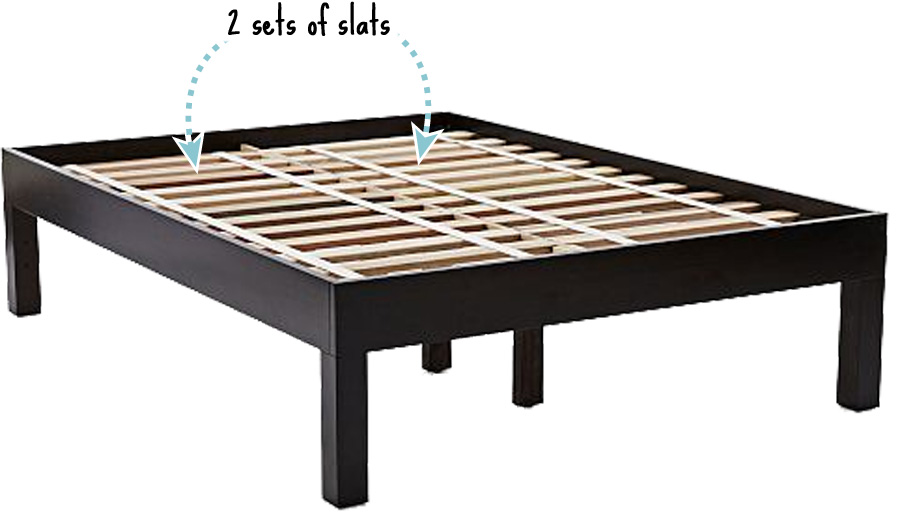
Our bed frame came with two sets of ~30" long slats – conveniently a few inches longer than both the width & height of our a/c unit, so we didn't need to make any cuts. Small victories! Each slat was attached to the next with some simple webbing that spaced them about 2.5” apart when laid out – a useful guide when it came to screwing the cover together. 

To start, Eli used a knife to free up 8 slats from the webbing – 4 from each set. I recommend using scissors instead of a knife cuz I like having 10 fingers & 10 toes, but Eli lives dangerously. These free pieces would become the vertical ends to form the box corners.

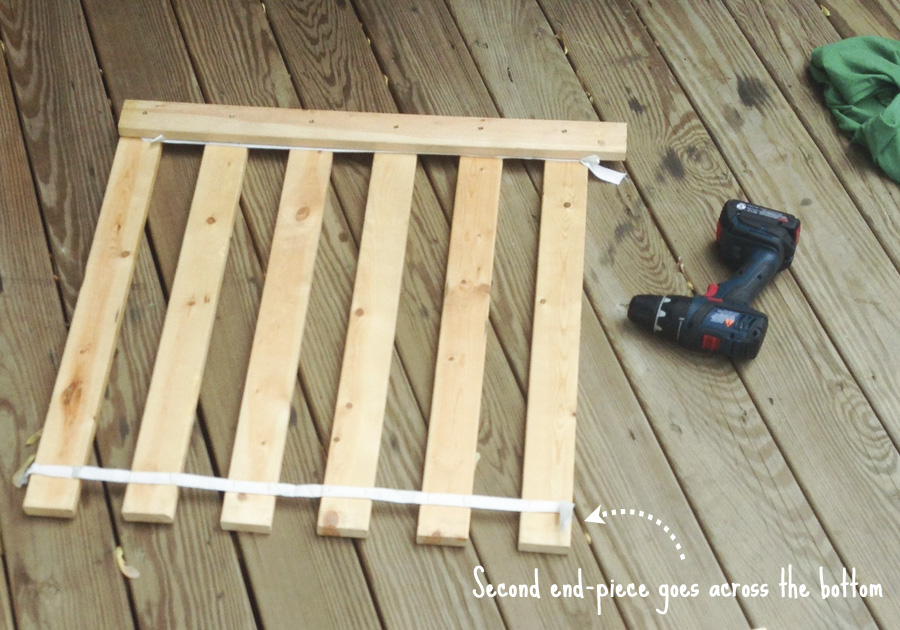
Then he laid out the remaining connected slats and lined one of the free pieces of wood across them perpendicularly to determine how many slats it would span. The answer for us, my friend, was six. He cut the webbing after every sixth slat to give us 4 sets of 6 attached slats. He laid out a section (helps if the webbing is facedown), overlaid an end piece across the top, and used screws to attach it to each slat. Then he lined up another end piece across the bottom and did the same. He rinsed and repeated for the other three sides of the cover.

Create an AC cover from wood bed-frame slats

Once he had his four sides assembled, he stood up two at a time, squared the corner, and drove a few more screws through the vertical pieces to connect them all. It helps to pre-drill the holes so you don't split the wood, and he earned a few extra credit points for using a countersinking drill bit so the nailheads sit below the wood's surface. If we're feeling ambitious we may putty those holes before staining, but it's just an outdoor utility cover, so I'm honestly not too concerned about hiding screws.

Eli squared the corners and attached the sides of the cover using simple wood screws

After all the wood slats were secured, he cut away the rest of the webbing. There he goes living dangerously again...

Eli used a knife to cut the webbing when creating the cover for our AC unit

And that was pretty much that! He just set the new wood cover over the unit, and BAM! Our a/c is now camouflaged to blend in with its surroundings. We didn’t attach it to the unit or the ground in any way and haven’t had any issues of it blowing over or moving. Added bonus: we can easily lift it off if we ever need to do any cooling repairs. The simpler, the better!

The final product is a simple wooden box that sits over the AC unit but allows plenty of breathing room for high performance

The cover gives the unit a few inches of breathing room on each side, and the space between the horizontal slats is wide enough that I don’t worry about hindering a/c performance. 

I'll make sure to post new pictures after we get everything stained. We just need a few consecutive rain-free days in the forecast before we can check that off the to-do list. Personally I was really impressed with Eli’s zero-cost solution for a common backyard problem. What have you guys tried to hide the ugly gray box?

Low Cost & Found: How to Make A Stool From a Lamp Shade

Happy Monday, folks! My most sincere apologies for missing Friday. The week was cray – news was breaking at work, my computer was breaking at home – it was brutal. My hard drive crashed, and it would have been complete devastation if not for Eli, my man of many talents who spent many hours salvaging my files (and forced me to backup in recent months). Watching him do surgery on my computer is a thing of beauty (think computer innards exposed, tiny screws everywhere, miniature screwdriver in hand). So here we are... Monday... perhaps the worst day of the week. Let's hope I can cheer you up with a fun and simple DIY!

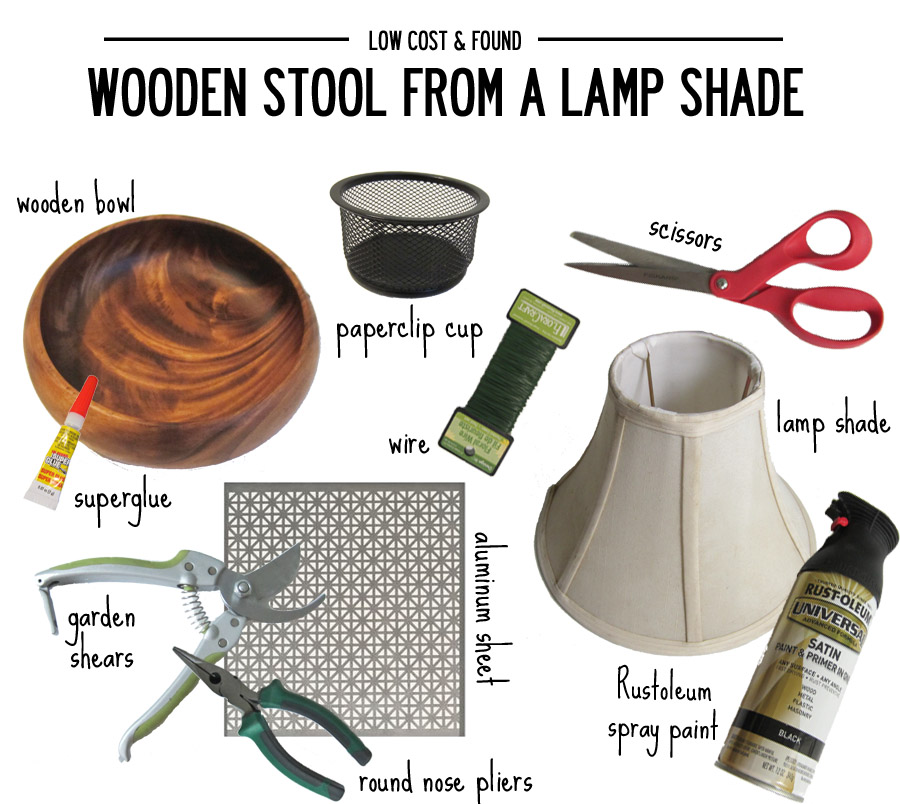
Supplies you'll need for this DIY to turn a lamp shade and wooden bowl into a decorative stool

Two months after sharing my wallpapering adventure, the powder room is STILL UNFINISHED. It's missing two things which are so small and at the same time so important: a hand towel rack/soap holder combo and a stylish stool (more like a miniature side table) on which to set extra toilet tissue for guests, and (perhaps more importantly) add a little styling je ne sais quoi in the room. I had a very specific image in my head of what the stool should look like but after months of looking I concluded it does not exist in the correct dimensions and price range, and so begins a game I will henceforth refer to as Low Cost & Found. It's bascially the MacGyver of DIY, in which I pilfer odds and ends from around the house, pick up some cheap supplies at the hardware store, and put them all together.

In this case, I had a beautiful wooden bowl from Homegoods ($14), a small lampshade that was about 6 inches tall and 4 inches wide across the top (you can find them at Goodwill for $1), a metal cup for holding paper clips, a Union Jack-patterned aluminum sheet ($10 at Home Depot, and enough for several projects), and some 22-gauge floral wire that was laying around the house. With the help of some cutting & bending apparatuses, some spray paint and super glue I made this... no power tools necessary.

A DIY project, making a stool from a lampshade and a wooden bowl

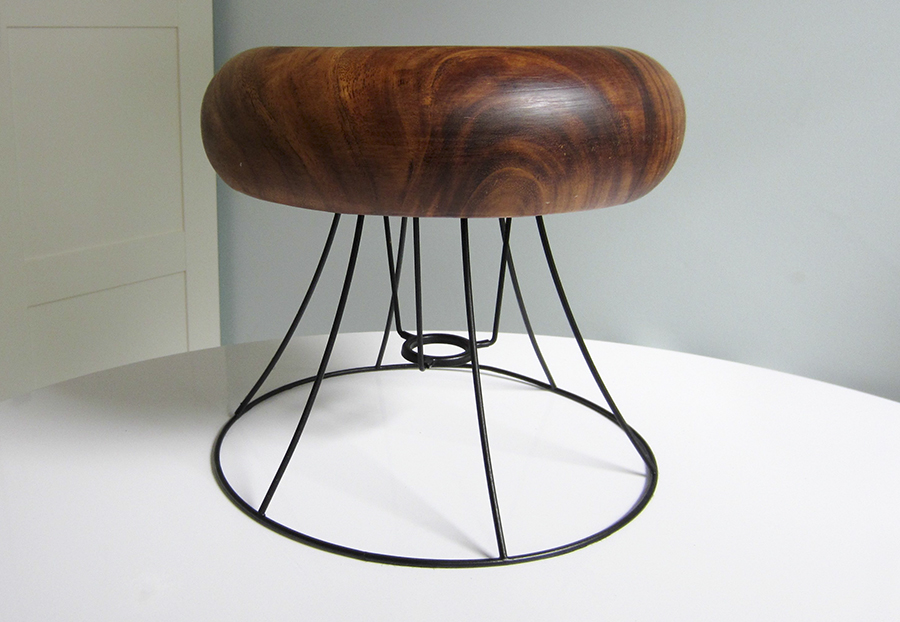
It's business up top and party on the bottom. I wouldn't stand on it – nor should you or your kiddies (it ain't made for that) – but for a pint-sized decorative stool, he's pretty cute. 

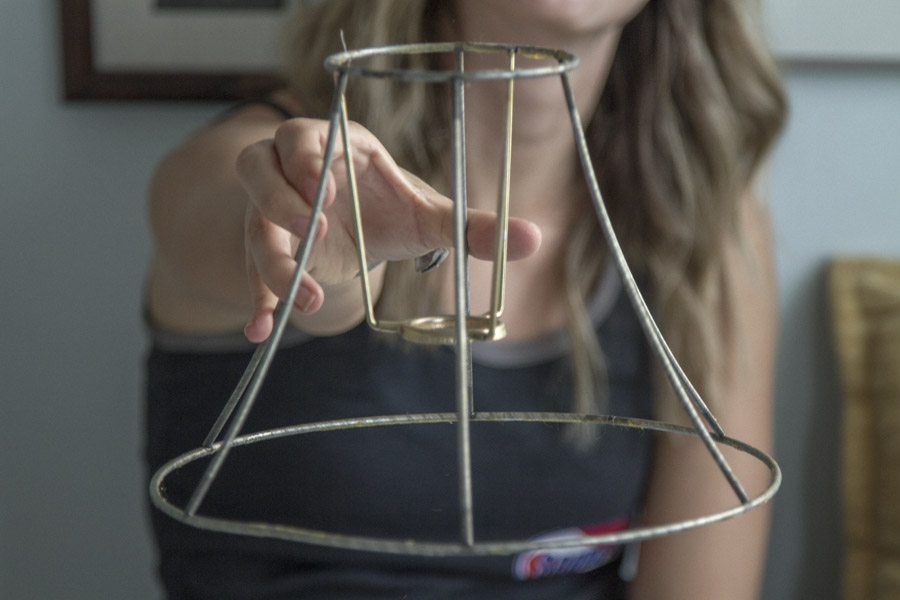
The first step in making it is to free the wire-framed lampshade from its dingy cloth cocoon. I removed it with scissors and then scraped off some really lovely, yellowed glue with my nails and a wet paper towel. I’m not sure whether these old metal frames contain lead (?), so if you do this at home take proper precautions. 

Step 1: Cut off the fabric lamp shade cover
Step 1: After cutting off the cover, give it a slight yank to remove it from the glue
The lamp shade has been cleaned down to its wire base and is ready to move on to the next step.

After cleaning the frame, I applied a thin coat of Rustoleum spray paint in a matte black. It’s paint & primer in one and is well-suited for metal. I let it dry outside for a couple hours.

Step 2: Spray the lamp shade with two light coats of Rustoleum spray paint. 

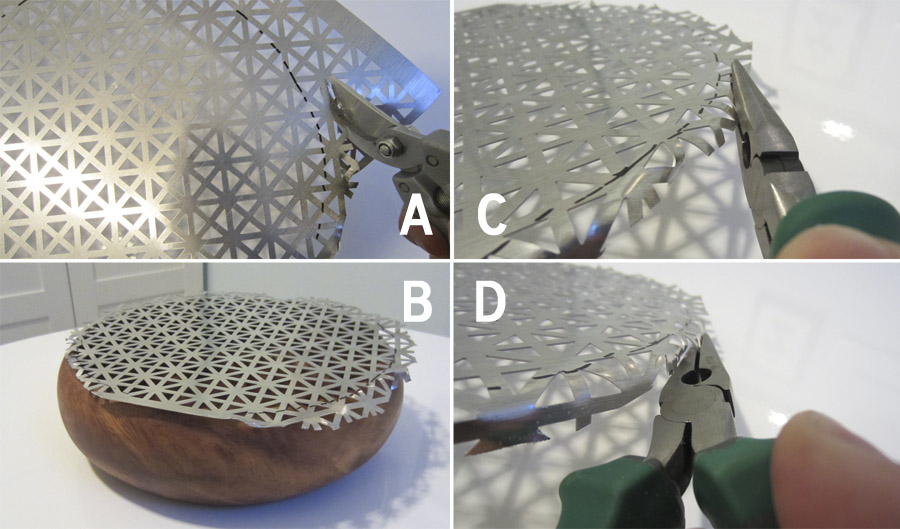
While the spray paint was drying, I marked the outline of the wooden bowl's rim on the aluminum sheet and cut around the circle with my gardening shears (err i mean, metal snippers... don't tell the gardening police). Then I used round-nosed pliers to roll the sharp edges down...giving the circle a curved edge that will fit nicely inside the bowl. I tested to see if the aluminum would fit inside the bowl as I went along, and stopped bending it when it could sit level about an inch below the outer rim. I decided to spray paint this aluminum black, but the silver would have been a fun look, too.

Steps for preparing aluminum sheet

I used a tape measure and Sharpie to mark the center of the bowl, applied a big glob of superglue, and then carefully placed the paperclip cup on my mark, dead-center. I piled on some books and heavy objects to weight it down and let it dry for an hour or so. The bowl had a nice flat bottom, so the cup was able to sit totally flat and level.

Step 4: Mark the center of the bowl and spread super glue to adhere the paperclip cup

This step was only necessary because the depth of my bowl and short stature of my lamp shade meant that my overturned bowl would cover half the shade when stacked on top. Goodbye, lovely curves! It's all about size ratios here and while the stool needed to be short, I didn't want it to look squat. I considered other options besides the bowl – for instance, if I used a round butcher block cutting board instead I could have just screwed it onto the base with some metal braces and called it a day. Unfortunately for me, I really fell for this bowl and decided it was worth the extra effort. So here we are with a total MacGyver move – supergluing a paperclip cup to make the bowl shallower, and hence saving the lampshade from being swallowed up when I stack them together later. Think of it as the bowl's booster seat. :)

Step 4: Attach paper clip cup to the center of the wooden bowl using superglue

While the cup and bowl were getting to know each other, I also applied a thin line of superglue around the top rung of the lamp shade and centered the aluminum sheet circle on top with the curled, jagged ends facing up. This time I used a jar full o' rocks to weight it down and dry, since a book would have gotten glued thru the cutouts in the aluminum. After it dried, I came back with some floral wire, threading it through the cut-outs and around the lamp shade's top rung to make doubly sure the two were secured. I then applied another thin coat of spray paint to the underside of the stool – covering the silver aluminum and green floral wire to get a cohesive matte black.

Step 5: Superglue aluminum circle to the top of the shade
Step 5: I also used wire to doubly secure the the aluminum sheet to the lamp shade

I used my pliers to twist the wire super tight... that baby was goin' no where. Make sure your aluminum circle is centered and level over the shade, because the paperclip cup and bowl are going to rest on top of it to make the top of the stool.

Step 5: Use pliers to tightly twist the wire

The last step is to attach the base and the bowl. I applied a last strip of superglue around the edge of the paperclip cup and carefully fit the bowl over the aluminum sheet, pressing down firmly when it was centered and level. 

Last step is to attach the lamp shade base to the bowl top.

Then I came back with some more wire to thread through the aluminum cut outs and the little holes in the paperclip cup. This was a little tricky (and perhaps not totally essential) because the holes in the cup weren't all that visible behind the aluminum sheet, and they were small to begin with. I used the wire like a fish hook and fumbled around a little til I got it through a hole. Then I twisted the ends tightly, snipped 'em close to the base, and used a Sharpie to color them black. Ooo, tricky, trick-ay.

A close up of the wire that I colored black and used to secure the lamp shade base to the paperclip cup/wooden bowl.

And there you have it, folks! An adorable little stool made almost entirely from stuff I found or picked up on the cheap. Look how perfectly it presents the spare TP!

Finished product in the bathroom

Sure, there aren't any small animals in the house to appreciate the cuteness of the underside, but I'm always prepared...just in case.

View from below: the aluminum sheet, spray painted black, gives a fun textured look.

The wallpaper is so bright and whimsical (which I'm still lovin', BTW) so the dark, rich wood helps to ground it with a level of seriousness, while the curvy bowl and wire base fits in with the playful nature of the room. 

My new DIY-ed stool, made from a lamp shade and wooden bowl

I'm so relieved that I can stop searching for tiny stools to fit in my tiny bathroom! Now I just need somewhere to hang that stinkin' hand towel! My combo soap holder/towel rack may turn into another game of Low Cost & Found, since I can't for the life of me find what I'm looking for. 

Finished DIY lampshade stool in the powder room

What did you guys get into over the weekend? And fun low cost & founds of your own? Hopefully no computer crashes...

Ikea Hack: Geometric Magazine Holder

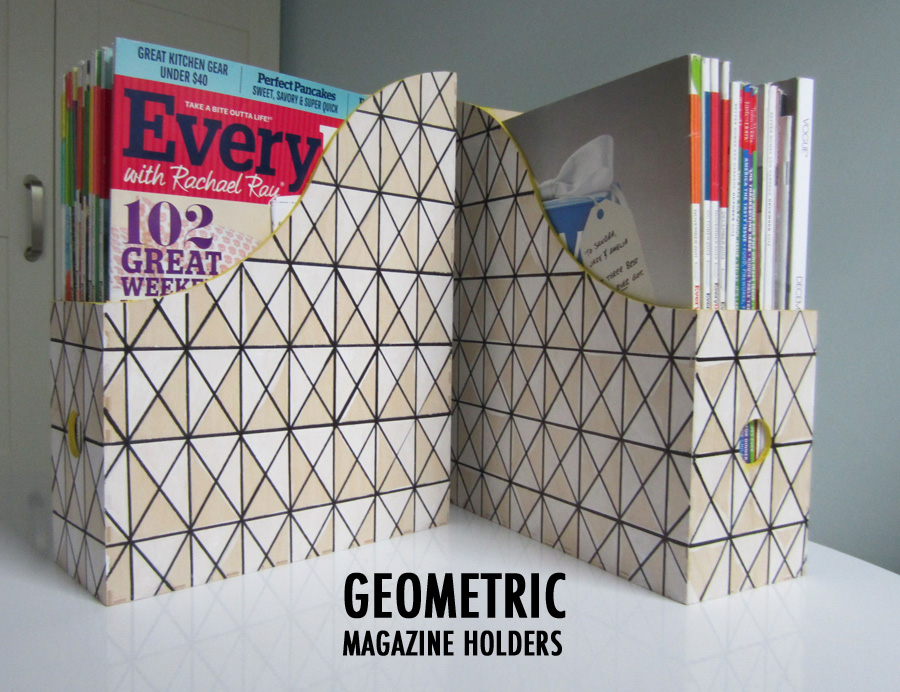
Ikea Hack: Geometric Magazine Holders

When E & I shared less than 500 sq. ft. in our previous apartment, we quickly learned that a jacket on the bench, shoes in the living room, a stack of mail on the table and an empty glass on the desk were all it took for the place to feel like a wreck. Suddenly 500 square feet feels like 300 square feet, and everything is just a liiiiittle more irksome. If you’re in a bigger space, clutter doesn’t really feel like clutter because it’s not invading your line of sight and you can live in blissful ignorance as the stuff spreads out instead of up. ;)

…Well, we don’t have quite that much space. My definition of clutter has gotten a tiny bit more lenient now that we’re in a house, but order is still crucial to making our space feel – y’know – spacious. The first area to tackle was our landing zone – the place we turned to upon walking in the front door to unload all the mail we just carried in, in-cah-luding that latest issue of Rachael Ray.

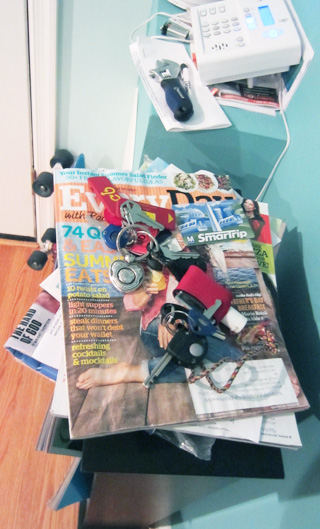
Messy magazine rack
Top of messy magazine rack

Beautiful. Just what you want to see when you come home! My landing zone, besides looking generally chaotic, was getting FULL UP with old issues of RR. I started subscribing on my mom’s recommendation a few years ago because I dread the grocery store and the idea of planning a meal every night, and frankly RR makes it easier. I will never ever claim to be an amazing cook – it just ain’t my bag. But if I diligently follow a recipe provided by a trusted professional, I’ve got a 50/50 shot of making something I’d actually want to eat. I should probably just invest in a single cookbook, but there are a handful of recipes in those issues that I’ve tried and succeeded at. So they basically comprise my entire cooking arsenal and now I can never throw them away!

Instead I made these wooden geometric magazine holders to bring order to the mayhem – an Ikea Hack that cost less than $15 and maybe an hour to do. Totally worth it, everyone should do it.

Magazine holder DIY supplies

WHAT YOU NEED

• KNUFF Magazine Files from Ikea – $10 for 2

• Craft paint (white & accent color) – $1.25 each

• Black Fine Tip Sharpie – 75 cents

• Ruler – 25 cents

• Small Paint brush – $2

• Pencil – 25 cents

Step 1: Draft horizontal guide lines

Use your ruler and a pencil to trace horizontal lines going around the file. I eyeballed the spacing to be about 1 ½” between each line, doing my best to keep my ruler level & my lines parallel.  When moving on to a new side of the box, I would line up the ruler so it matched the lines on the side I just finished. That way the lines are consistent all the way around.

KNUFF file folder DIY

Step 2:  Flip that ruler on its side and do it again! 

Sort of. You could do the exact same thing horizontally, but then you would have squares. That wasn’t quite the look I was after, so I spaced my vertical lines about an inch apart. My ruler was coincidentally an inch wide (not actually a coincidence), so I was able to trace both edges of my ruler, scoot the ruler over an inch and do it again. Working my way around like this meant my pencil lines were all evenly spaced and parallel. Pow! Pow!

Step 3: Connect the dots

Instead of connecting the corners of each and every rectangle individually, you can connect the corners of a whole diagonal row at a time using your ruler. Don't be alarmed if they're not matching up perfectly every time. These are just your guide lines, they'll be covered up later.

vertical-lines-ruler-file.jpg
connect-corners-ruler.jpg

Step 4: Paint your triangles

Next, use your paintbrush and white craft paint to start coloring in some triangles. I tried this out two different ways – first, I tried painting triangles that halved each rectangle and then I tried painting smaller triangles quartered each rectangle. I think I like the latter better, but the white is really subtle on the light wood, so the difference between the two is not all that drastic. I only used one coat of paint which gave it a very cool whitewash, two-tone wood look. I love the subtlety ("Subtlety" is a weird looking word).  Don’t be too anal about painting inside the lines, it’s actually better to cover your pencil marks to create a sealed base for your black Sharpie to go over. Because the white is light, you can still clearly see your lines. 

files-half-white-triangles.jpg
files-quarter-white-triangles.jpg

Step 5: Retrace your lines for real this time

After the paint dries (which took all of 10 minutes for me), use the ruler and pencil marks as your guide to retrace all the lines in Sharpie. Like I mentioned in the last step, it's best to draw over the dry paint. These holders are wooden, which makes them feel more substantial, but it turns out that Sharpie bleeds when you draw on wood. That's not a good look. So draw over your dry paint and delight in your crisp black lines.

Step 6: Move on to the next one

After I finished the first magazine holder, I laid the two next to each other and lined it up, so I could draw my lines in the same place. This way they pretty much appear to be one big file when pushed together.

lining-up-files.jpg

Step 7: Trim it out with an accent color

I chose yellow, as I often do, but you can use whatever color you like. I washed out and dried my paint brush, and then used it to carefully line the exposed edges with yellow paint. I considered painting inside the file too, for an extra pop, but ultimately decided that was a risk I didn't want to take. It could have created a sticky surface for my precious mags. 

accent-color-magazine-rack.jpg

That’s it! Fill them up with your own collection of RR – or Vogue or Vanity Fair or Rolling Stone or whatever you collect. I set up my new cooking library on the built-in shelves in the living room (a mere 10 feet from the kitchen). Eventually I’d like to have some floating shelves or an open-ended cabinet in the kitchen to set these on. That would be more logical and might encourage me to start cooking again. ;)

As for the big magazine rack, it’s sighing with relief that it’s no longer overrun with RR. It’s got a new home by my breakfast nook, where it has a frequently changing selection of lighter reading. 

magazine-holders-bookshelves.jpg
magazine-rack-sneak-peak.jpg

Sounds easy enough, right? For $15 and an hour of time, these puppies made a big difference.