How to Float Mount Pictures in a Frame

How to float mount pictures in a frame, via Little House Big City

If you asked me what’s the 1 thing I’m most embarrassed about when guests come over, I’d say it's a tie between my junk-filled guest room and the number of naked walls begging for some personality. I mentioned back in October that I’m being incredibly picky about what I put on my walls now that I own a house. In previous apartments, whatever I could find for less than $30 at Homegoods would do, whereas now I want pieces that are more meaningful to me.

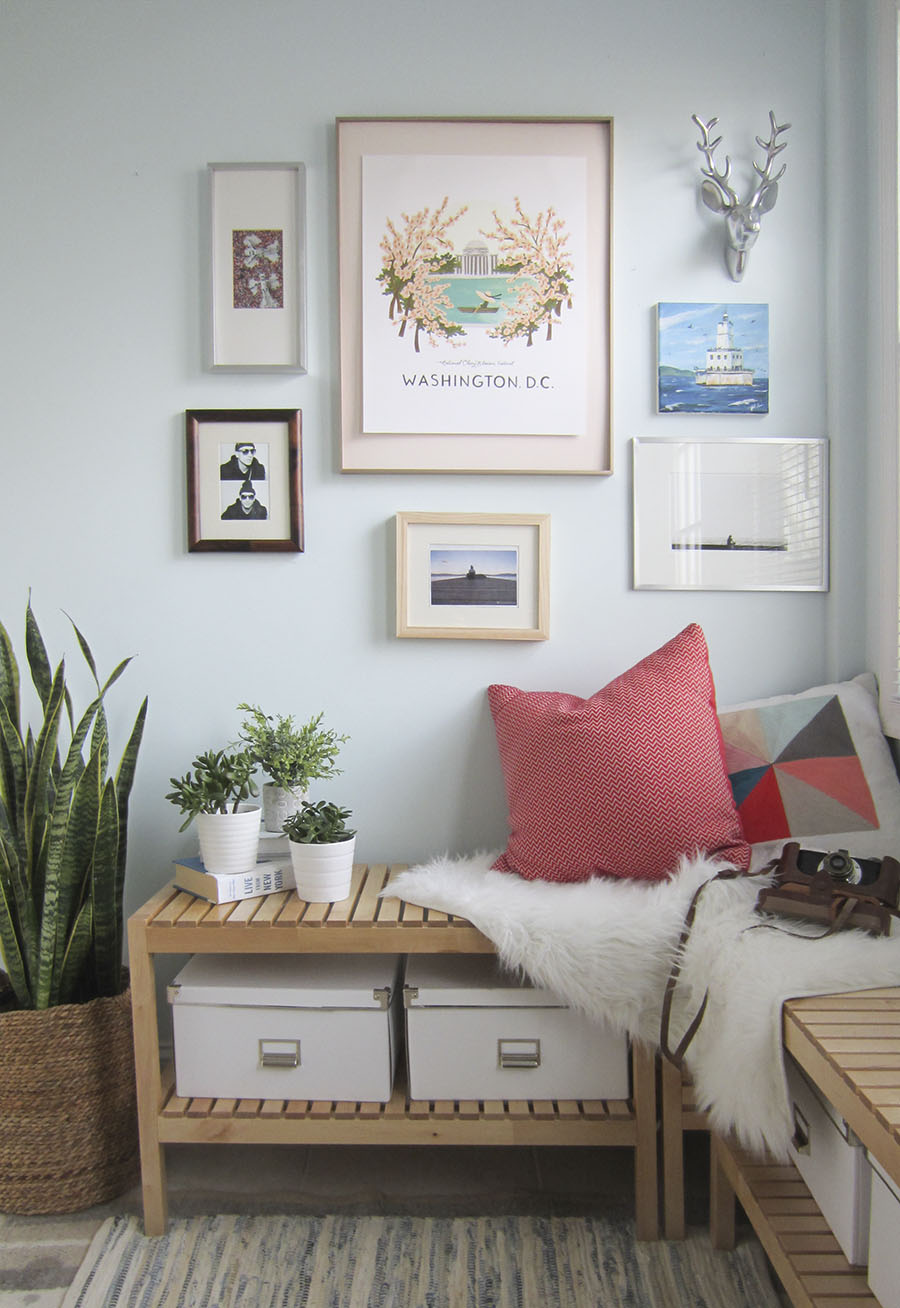
Last christmas my little sister gave me this print from Rifle Paper Co. that I adore because it reminds me of my favorite time of year in the city AND because I continue to nurse a sick obsession with all things RPC. It only took me two months to get this print up on the wall, which has gotta be a new record. 

How to float mount pictures in a frame, via Little House Big City

Matting and framing can be an intimidating and expensive process – as in I almost spent $100 to get a pale pink mat cut for my 16 x 20 image. Thxbutnothx. Then I got wise and did it myself for 10 bucks (thank you, self, for giving me such a good deal). I decided to float my print instead of going with a traditional mat because it feels fresh and unexpected, plus it's a heck of a lot easier to do in my very humble opinion. A float mount is when the image looks like it's hovering on top of your mat rather than peaking through a window. It's ideal when your artwork goes to the edge of the paper or when you've got a nice textured edge. My print fit neither of those scenarios, but I do what I want! We'll all float on alright, Already... 

Supplies:

Step 1: Cut the mat board to the size of the frame

How to float mount pictures in a frame, via Little House Big City

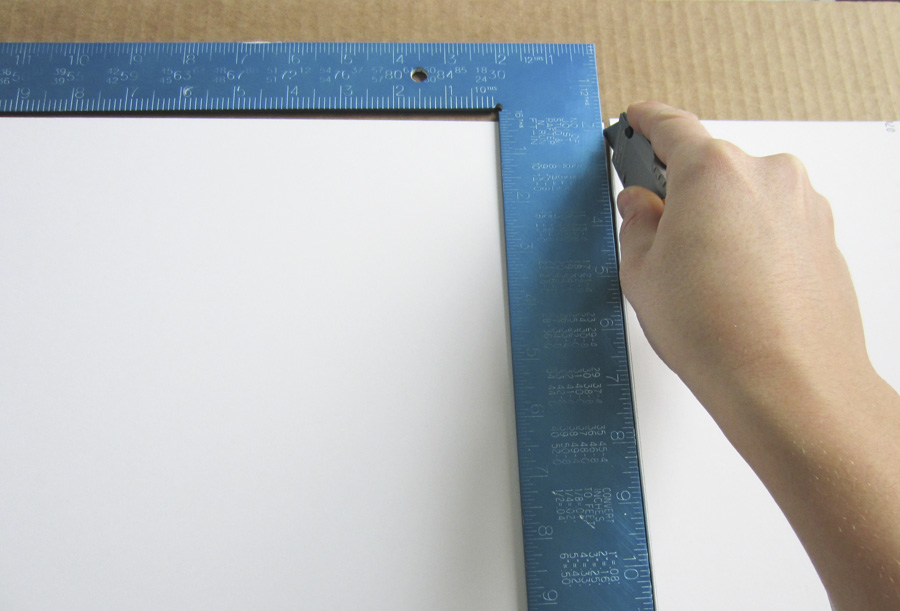
Making sure I was working on a totally clean surface, I laid the mat board face down and marked my cuts using the back of my frame. Then I held my straightedge firmly on the line and followed it with a box-cutter. Mat board is surprisingly sturdy and it took me a couple attempts to figure out that I really needed a brand new blade, and I needed to press down pretty hard. It's also a good idea to have something tough underneath to protect your table... (whoops)

Step 2: Mark where you want the picture to go

How to float mount pictures in a frame, via Little House Big City

I centered my picture on the mat board (still face down), eyeballing the position, then checking with a measuring tape before tracing the top corners.

Step 3: Cut a slit a little narrower than the picture

How to float mount pictures in a frame, via Little House Big City

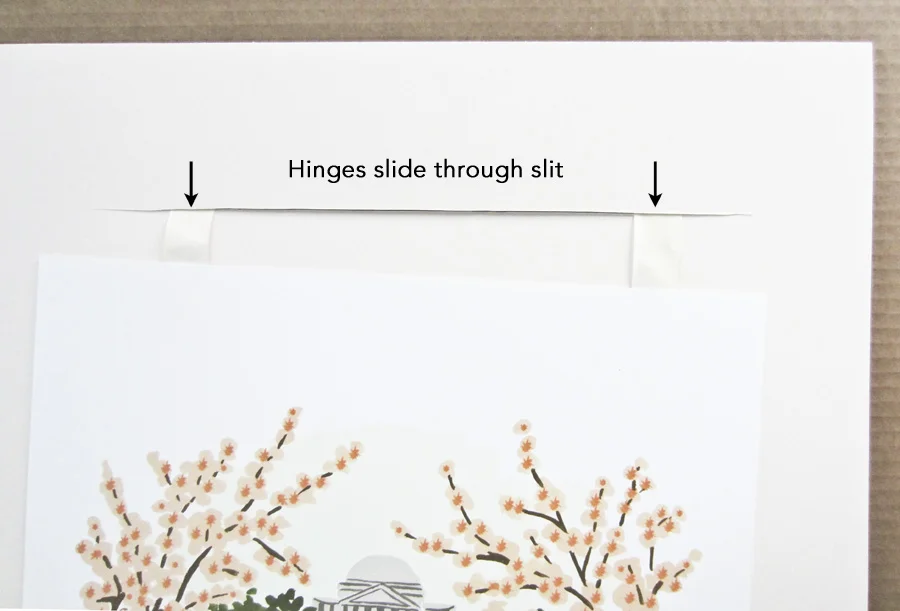
Once I knew where the top of my picture would be, I cut a slit about an inch lower than that and about two inches narrower than the width (an inch from either side)...that way the cut will be totally hidden once the picture is in place. 

Step 4: Apply hinging tape to the back of the picture

How to float mount pictures in a frame, via Little House Big City

How many types of tape does one world need?! Gummed hinging tape! Never thought I'd buy something so specific, but this stuff is used to preserve the sanctity of all that is holy in your artwork/photo/certificate/whatever. It's actually very nice because it holds well but can easily be removed later. The specific variety I used is great for heavier weights of paper, but I'm not sure how it does with thinner stuff.

I tore off two 2.5" pieces and sprinkled a little water on the tips. I gave it a couple minutes for the water to activate the tape's gumminess and then stuck'em to the back of my picture....but just the tip! The box says not to adhere more than a quarter inch of the tape to the artwork itself. I placed my tape about an inch from the top of the picture and a few inches in from the sides. 

Step 5: Slide tape through the slit and secure on the back

How to float mount pictures in a frame, via Little House Big City

Once the tape dried I slid the flaps through the slit on the front of my mat. Because I placed the tape away from my picture's edges, I had some leverage to adjust its final position. That was helpful because I didn't trust my slit to be level or perfectly centered.

How to float mount pictures in a frame, via Little House Big City

Once I was happy with the placement I carefully flipped the mat board & art over onto a clean (!) surface and secured the tape. If you don't want to risk messing anything up you could also slide it over to the edge of the table face up and finish taping from below. I carefully wet the remaining flaps of tape, let them gum up, and secured them to the back of the mat board. Then I tore new pieces of tape, gummed'em, and placed across the originals to form a T. This is called a T-hinge – go figure! The pros recommend it because it secures the artwork from the top while letting the bottom hang free. Fun fact of the day: Art breaths... it needs air circulation and space to expand and contract when the humidity and temperature changes in your house. Who knew?! 

Step 6: Frame the picture and add spacers

How to float mount pictures in a frame, via Little House Big City

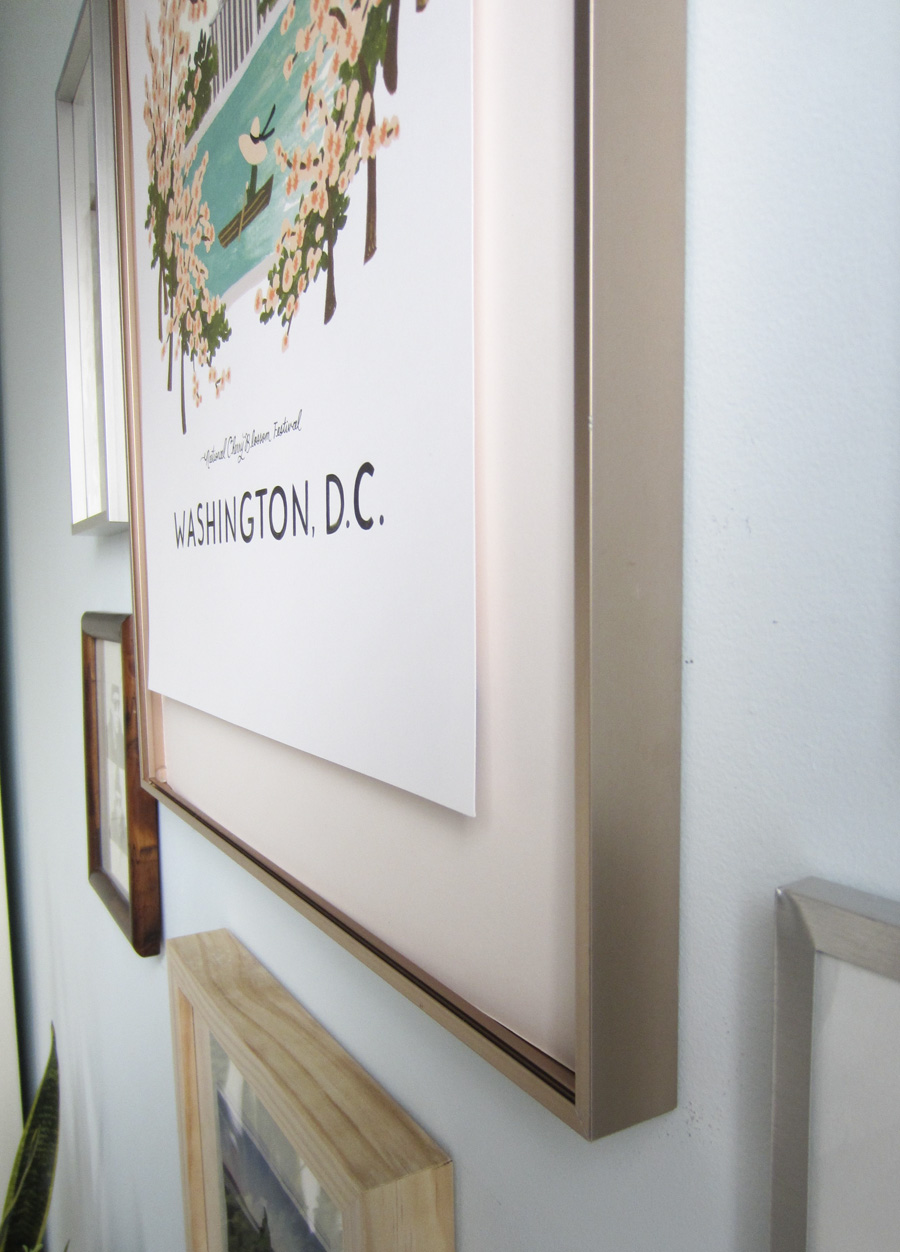
That's a cross-section view of my frame. Speaking of breathing, I added spacers so the print wouldn't be pressed against the glass. Don't suffocate your art, people! A traditional mat does a good enough job at this, but with a float mount the picture is vulnerable! It needs a spacer to step in and tell that glass to back the heck off. I used some round plastic bumpers that I'd picked up for our kitchen cabinets... you know the nubbins that keep the doors from banging every time they shut? I cut about a quarter off the top so they'd fit and then pressed the sticky side against the inside edge of the frame. I put them at the corners and the midpoints to keep the mat pushed back, and they're hidden behind the front lip of the frame.

Step 7: Marvel at your cleverness

How to float mount pictures in a frame, via Little House Big City

OoooOOooOooOOooOOoo .... it's floating! And if you noticed there's no glass in that frame, fear not. I removed it for the pictures to nix the glare and reflection, but it's going back in tonight :) To be sure, this is just one way to float. Another way is to mount the picture on foam core for a more pronounced look, but I preferred a more subtle (read: simpler) approach for this particular print.  

How to float mount pictures in a frame, via Little House Big City

The finished project has me grinning ear to ear! I love the print, and how the pale pink mat and rose gold frame play on the cherry blossoms. Thanks to my sister for this beautiful present – my walls are a little less naked! Now if only we could fast-forward to May and take a boat out on the Tidal Basin.  

Gallery wall sources clockwise from left: stormtroopers photo by Joe Shymanski | Washington D.C.  from Rifle Paper Co. | reindeer from Homegoods | Painting by Paul Olsen | Black & white horizon photo by Steven L. Miller | Color horizon photo by Eli | Eli self portraits 

Refinishing the Stairwell

 
How to refinish a stairwell

Happy Friday, friends! Today is my birthday – I’m a quarter of a century old and really excited about what the next year holds! I don’t know yet what’s in store, but I have a very distinct feeling that it’s going to be wonderful. Before I tell you about this week’s house project, let me throw out an idea.…an invitation, even. I, Chloe Joy, invite you to send me your problems. Preferably the house/design/DIY variety cuz I don’t know much about cars or babies or psychoanalysis. Got a room that’s driving you nuts? Need a second opinion on paint colors? Not sure where you’re gonna store your holiday decorations? Tell me about it (no, really)! I would love to help if I can, so send me your question to chloejoy@littlehousebigcity.com (or by filling out this contact form) and include pictures if relevant. I think it would be fun to feature these Q&As here once in a while, what do you guys think?

And now back to our regular programming…

Last weekend I had to take a break from all the victory dancing to tackle the buzzkill that was my staircase. The floors were refinished and beauteous, but the newell posts and handrails  were left untouched. I realized kinda late in the process that they would cost extra if I asked the flooring guys to do them, so in a minor lapse of judgement I decided I’d just do it myself. I have no idea how much more it would have cost, but I’m fairly certain it would have been worth the $$ to have them done at the same time as the floors. 

The stairwell was glaring at me after the floors were refinished

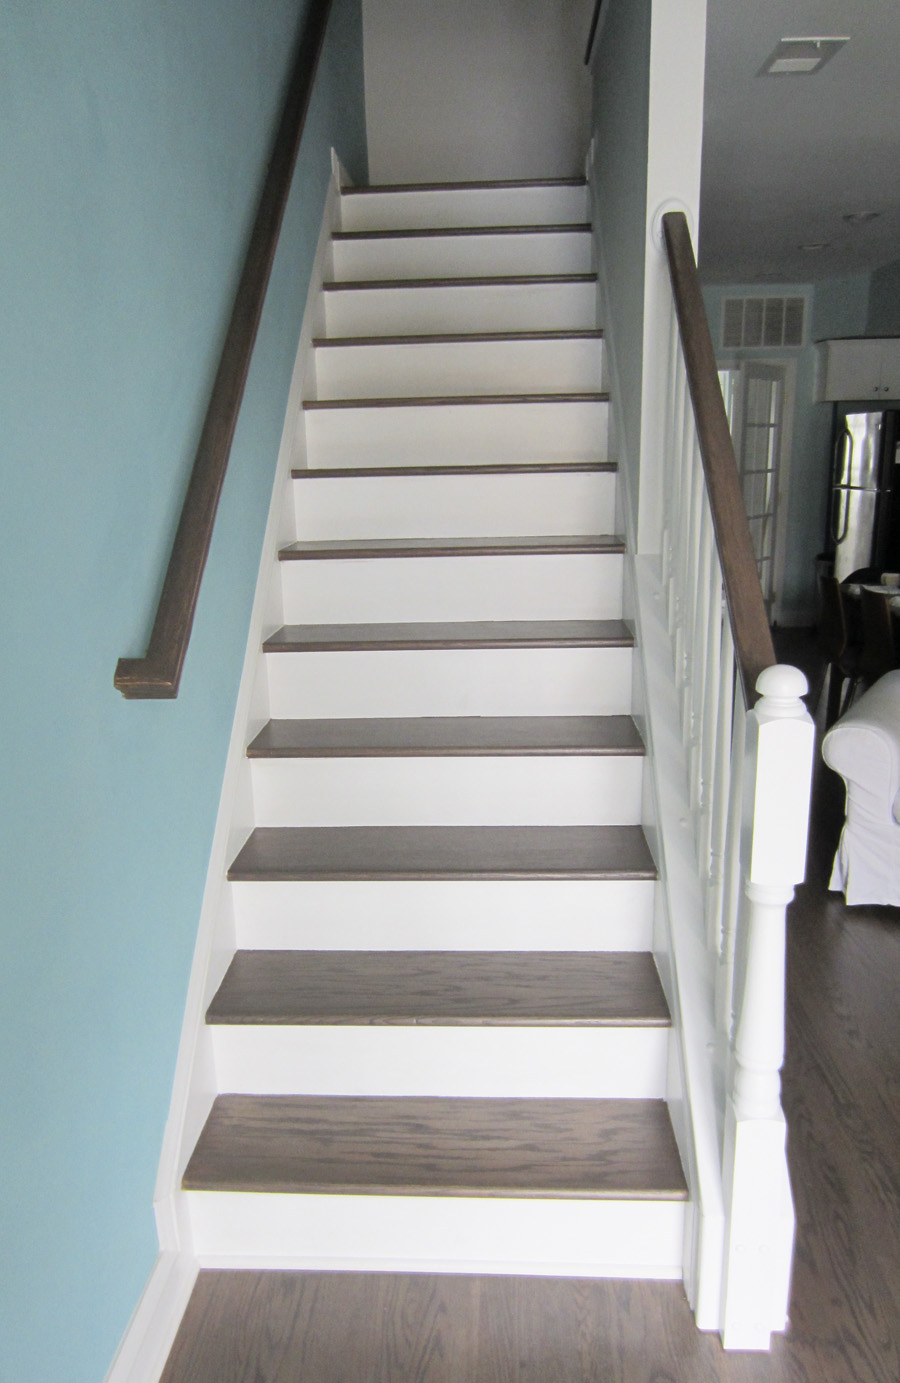
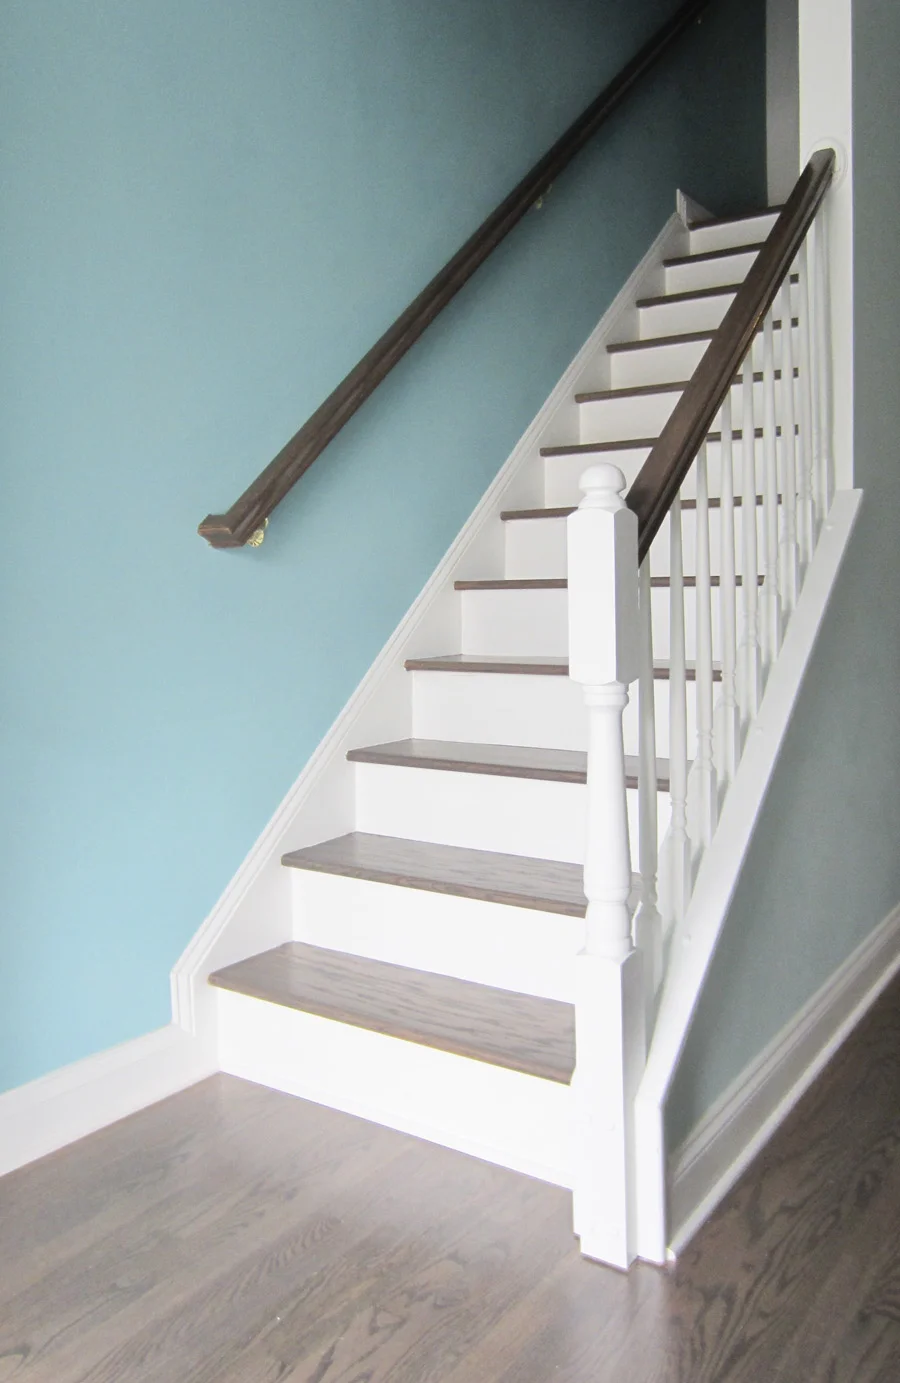
Don’t get me wrong – it wasn’t particularly difficult – just tedious, time-consuming and messy. That said, it did make a huge difference and I recommend it if you’ve got a staircase that could use a facelift. It looks so much better and could be done in a weekend! The folks who renovated the house before we bought it chose generic everything, and poly’d the railings and posts just like the floors. My plan was to paint everything white except the railings, which I’d stain “grayown”, like so: 

Refinishing the stair well was well-worth the effort!
refinished-stairwell-2.jpg

Here’s what I needed to get started:

  • Sandpaper – 60 grit, 220 grit, & 400 grit
  • Orbital hand-sander and Black & Decker Mouse Sander – sorta optional but really helpful
  • Tack cloth
  • Painter's tape
  • Staining brushes
  • Oil-based primer
  • White semi-gloss paint to match trim
  • Stain to match the floors 
  • Water-based polyurethane
  • Paper towels

Step 1: Sanding

Before I could do anything, I had to sand everything with a rough 60-grit to remove the poly and rough up the surface Then I followed up with a fine 200-grit. I conquered my fear of the orbital hand sander and went to town on all the flat bits, like the tops of the railings and the sides of the posts. The orbital is GREAT – so efficient and it has an attached bag for collecting dust. I wish I could have used it to do everything, but it’s not well-suited for nooks and crannies – of which staircases have many. For those I used the Mouse and a sanding block designed for bending around curvy posts. This was by far the worst part of the job… after seeing how fast and effective the orbital was at getting down to nice raw wood, hand-sanding felt like running a race in a vat of jello. I focused most of my energy on the railings, since those needed to be totally raw to accept the stain, and then I just roughed up the posts which were going to be primed anyway. 

I used the DeWalt orbital hand sander to remove most the finish on the stairwell

Step 2: Cleaning

Starting out with the orbital sander, there was minimal dust. When I switched to the Mouse my house turned into the Serengeti. You would have thought I’d sanded an entire Redwood forest down to a few toothpicks there was so much dust, and that's when I most regretted not asking the floor guys to take care of the railings. My new beautiful hardwoods were defiled!! I wiped everything down with a damp rag and then vacuumed, swept, and mopped the entire floor. Then I used a tack cloth to gently wipe down the railings and posts again. Fun fact: Tack cloths are literally tacky – their purpose is to grab all loose particles on a surface before you paint or seal it. The ones I got from Home Depot left a sticky residue on my hands that was really hard to get off, so do yourself a favor hold tack cloth with a clean paper towel. 

Step 3: Taping

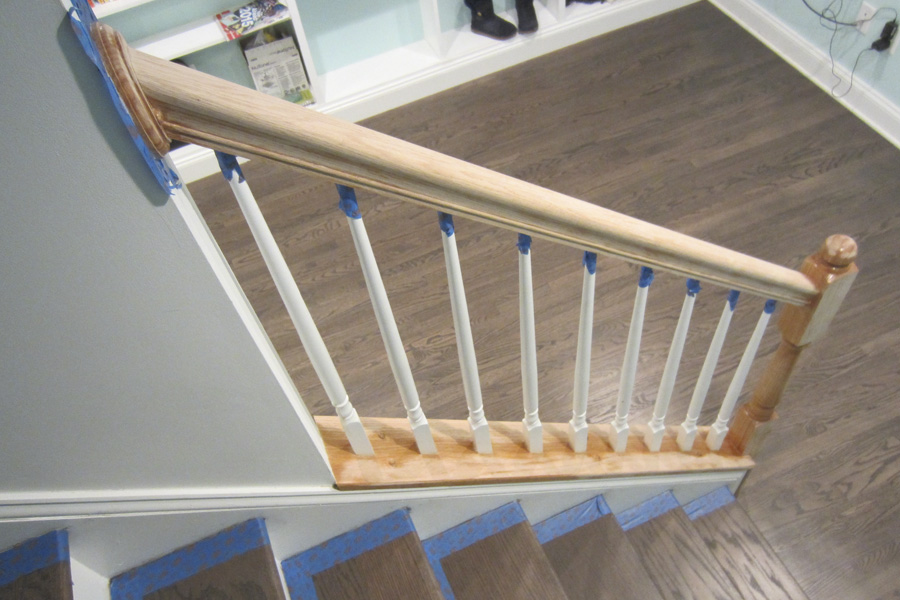
I taped around the steps and balusters to protect the surfaces while staining and painting

I taped the tops of the balusters, the floor around the base of the posts & balusters, and the wall behind the long railing leading to the front door. I knew I’d be touching up the stair risers eventually, so I carefully taped those edges off too.

Step 4: Staining

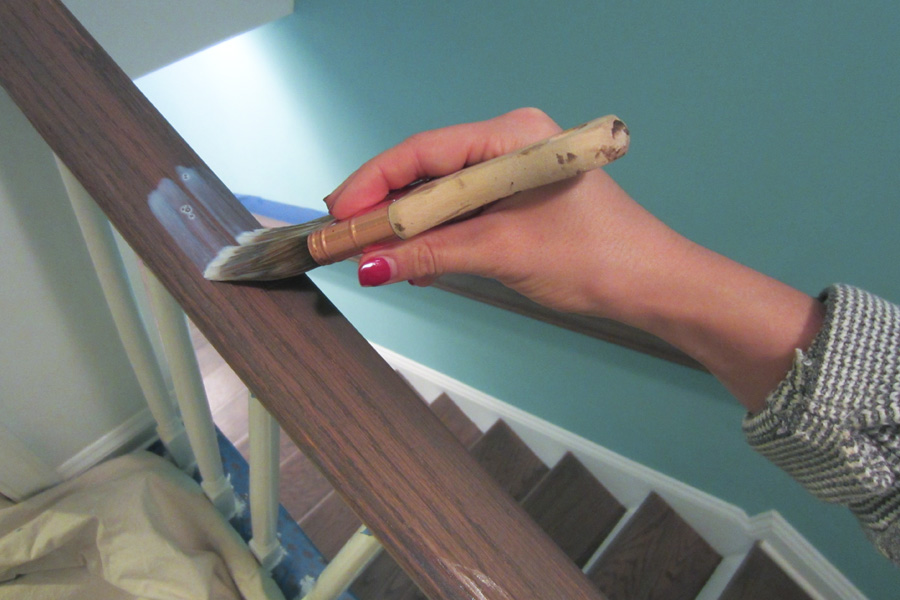
I used a paper towel to wipe stain on the handrail

The flooring guys left me a quart of leftover stain, which was a real blessing because I didn’t have to stress about whether it would match the floors. Stain is very watery and a breeze to apply, just watch out for drips. After stirring the can, I just dipped the edge of a paper towel in and then wiped it down the railings in the direction of the wood grain. I stained all sides of the railings, including the bottoms. Just like the floors, it took two coats to get a dark enough color. I applied the first coat Saturday night, let it dry overnight and then applied the second coat Sunday morning.

Step 5: Priming

Once the stain was dry enough I taped it off so I could paint the posts

While the railings dried, I applied a thin coat of primer to the posts and the angled base the balusters sit in at the bottom of the stairs (does that have a name??). I focused on the lower sections first, and then taped off the railing edges after they had some time to dry so I could prime the tops of the posts. I made sure to get a really snug fit with the tape – getting into all the curves and notches so I wouldn’t be priming my freshly stained railings. Keep an eye out for drips. I gave the primer about 2 hours to dry, per the instructions on the can.

Primer

Primer on the stairwell posts

3 Coats of Semi-Gloss

I applied 3 coats of white semi-gloss paint to the stairwell posts
I touched up the base of the balusters and around the stair treads

Step 6: Painting

I applied three thin coats of white semi-gloss paint and sanded between each coat with 400-grit sandpaper. I’m not sure the exact shade because it was leftover from the guys who renovated the house, but it’s the same white used on all the trim in our house. While I was at it, I gave the stair risers two fresh coats of paint to cover up the stain marks from the last 2 times the floors were done. Oh Lordy, talk about nerve-wracking! I did not like applying white paint so close to my brand new floors. I was so nervous about dripping paint on the floors or the tape not having a tight enough seal. There were a couple close calls and i had to put my finger nails to serious work, scratching up any paint flecks that dared besmirch the floor.

Risers Before Paint

stairs-before.jpg

Risers After Paint

stairs-after.jpg

Step 7: Sanding and sealing

I applied 3 coats of water-based ply to the hand rails

Once everything was 100% dry, I lightly sanded the hand railings with the 400-grit sandpaper which made them incredibly smooth. Then I wiped them down with a clean rag, then a tack cloth, and then I applied three thin coats of poly with a brush. I used crystal clear, water-based poly in a satin finish to match the floors. The sealer I used specified not to apply more than 2 coats in one day, so I put on the first coat, waited an hour, put on the second coat, went to bed and then put on the final coat. And that was that! The stair case is lookin' fresh to death! 

Finished stair well gleaming

Have a great weekend y'all! I'm putting the computer away and spending time with my family to celebrate getting another year older :)

Turning a New Leaf: Keeping Houseplants Alive

Turning a new leaf: How I'm keeping my house plants alive

One night last week – an hour before Home Depot closed – I got the sudden overwhelming urge to buy a houseplant. No contemplation necessary – I dashed out of the house in search of one. I must have blacked out as soon as I got to the store cuz when I came to I was sitting in a jungle formerly known as Eli’s car.

Welcome to the jungle – Eli's car full of plants.

One plant turned into 5: a snake plant, a ZZ plant, 2 jade plants, and a larger-than-I-realized fiddle leaf fig. This was probably ill-advised given my track record. I once killed a jade plant & 2 succulents within just a few short months of owning them – so much for "indestructible"! This is all to say that my new plants are probably doomed, but I'm really gonna try harder this time to keep them alive. Starting by actually finding a home for each of them that suits their needs, rather than just putting them wherever I think would look prettiest in the room.

Indoor plants are just too good to give up on...they totally elevate a room with dimension, color, movement and life.  They’re especially great in small spaces that otherwise can start to feel claustrophobic & stale. I especially like tropical plants that trick me into feeling like I'm in Fiji about to go to the beach instead of in DC about to go to work.

Living in an urban, attached rowhouse kinda limits my options for acceptable plant real estate – there isn't much natural light & I like to keep the blinds closed while I'm at work for security reasons. On the bright side (ha!), 2 of the 5 plants I picked out promise to do just fine without a ton of sun, so there's a chance I can give the other 3 what they need. Here's a quick introduction to the newest members of our household and how I plan to care for them, as well as an honest assessment of their chances for survival. I know there are some expert gardeners reading this, so please chime in to let me if I’m doing OK or royally screwing it up!

Fiddle Leaf Fig (figs not included)

Fiddle leaf fig sunbathing in the guest room

I often second-guess my design choices – do I still like the color of the walls? were the built-ins the best way to go? who am I? where did I come from?–  and yet the moment I carried this guy over the threshold I was all, “I LOVE EVERYTHING.” No matter where I put him, everything around just seems to gel better. That must be why all my favorite designers & bloggers insist on them. That being said, after doing some research (which sounds much more exhaustive and scientific than “After googling it…”) I've decided to rename him to the Fickle Leaf Fig (AKA Mr. Fickle for short), cuz man is he needy! Here’s a quick rundown of his (many) likes & dislikes.

Lots of sunlight – but only the indirect kind.

Whoops – my house might fall under "cruel and unusual punishment" for a plant of his caliber. I do have a few dependable sunny spots that might work, but the only one that has enough available space for a TREE is the guest room/office. Eventually I’d like to bring more natural light into the house with skylights & glass doors, which could be Mr. Fickle's passport to travel the far reaches of the house. Until then, my mission is simply to keep him alive and ogle his beauty.

High humidity.

Lucky for Mr. Fickle, DC is a humid mess from May until October. Unlucky for him, it's now November. (wait, WHAT?!) I don’t plan on buying a humidifier, but I'll reconsider if the situation gets really dire. For now, I’ll just use a spray bottle filled with warm water to mist the leaves every few days like he’s Kim K. (Note to self: buy spray bottle)

Apparently vents are a silent killer of fiddle leaf figs everywhere. Too much air flow (hot or cold) can dry him out, so I’ve positioned him away from those. I’ve heard that in the summer months I can even let him play outside as long as I keep him out of direct sunlight – then he can truly appreciate all the humidity this swamp has to offer! 

Water somewhat sparingly.

Fiddle leaf figs prefer well-drained soil and should only be watered when the top inch of soil feels dry. As long as I remember to check, this shouldn’t be a problem. Of course there's an app for that, called Koubachi that I may have to check out. Watering is always the hardest part for me. My plants get sad and the experts say, “You’re either watering too much or not enough.” That’s like saying, “Your cat is either dying of starvation or he's morbidly obese…it’s hard to say. You could try feeding him more or less, but make the wrong choice and he's a goner!” Is that supposed to be helpful?? But I digress. I’m just gonna check the soil once a week by sticking my finger in the dirt to tell if it’s wet or dry, just like I do when I need to test if a cake is baked all the way. Also, I need to find a snazzy planter with the appropriate drainage holes.

Repot when the roots start to show.

I shouldn’t have to worry about repotting this winter, but next spring I’ll check the bottom of the planter for roots. If they start growing out of the bottom holes it's time to get a bigger pot.

De-dustify.

The leaves on this guy are bigger than my head, and that's saying something! Just like anything else, they collect dust. Unlike my lamp, if Mr. Fickle gets covered in dust he can suffocate and die. That should be motivation enough to dust the house more regularly!

Chance of survival in my house:

Medium. Okay, more like medium-low, but a girl can dream, can't she?  I’ll keep you posted, hopefully with updates of how much fun Mr. Fickle is having and how he doesn't even mind me calling him fickle nor does he miss Cameroon at all! Cross your fingers, people.

Snake Plant

Snake plant laying low in the laundry room

Less luxurious & show-horsy than Mr. Fickle, but still very interesting, attractive and green. The snake plant (aka Mother-In-Law's Tongue) prefers a regimen that's more my speed.

likes indirect sunlight but can get on ok without it.

From what I've read it sounds like any amount of indirect light should be fine, so this plant has a lot more options in terms of finding a place to live. Let that be a lesson for picky people everywhere! For now I’ve set him by the back door in the laundry room, aka my favorite place to chill. I’ll probably move him when it starts to get really cold so he doesn’t freeze every time I open & close the door.


Water sparingly.

If this plant starts to turn yellow it means he's thirsty. I like that he promises to give clear signals – communication is the key to a beautiful relationship!

chance of survival in my house:

I like his odds!

ZZ Plant (Zamioculcas zamiifolia)

ZZ plants are some of the lowest maintenance plants, so I've placed mine in a nook that only gets slight amounts of light. 

Yes, this picture is dark – welcome to my house. : ] I think this is the first peek of my hallway on the blog, and as you can see there ain't much goin' on yet. The ZZ plant is trying to change that and encourage me to put some artwork up on the walls... I hear you, ZZ Top, I promise it's coming.

Sunlight optional.

You may recognize this plant from all the times you pinched its leaves as a kid in the mall trying to prove to your friends that "yes, it is TOO a real plant!" He’s real, he's lush, he doesn’t need much – which is why he'll do just fine here. He even gets a very small glimpse of all the light Mr. Fickle is enjoying in the guest room, and that gives him hope for a better future. (clearly I've moved on from plants and am now waxing poetic about the 99%)

Water sparingly.

Like the snake plant, ZZ Top prefers well-drained soil and doesn't need to be watered much. In fact, I hear it’s better to forget to water than to overwater, and we know how good I am at that! 

CHANCE OF SURVIVAL IN MY HOUSE:

If he dies I am officially the worst and should be banished to live in an old shopping mall that doesn't even have a Pottery Barn or mattress store to sleep in.

Jade plants

Jade plants like full, persistent sun

Despite my better judgement and the dead jade plant already weighing on my conscience, I bought 2 smaller plants. Their squishy-looking leaves are just so majestic, I can’t help myself!

sunlight necessary.

Jade plants like full sun. My last one (God rest her soul) was perched on the living room built-ins – close to the front window but probably not close enough. The front window doesn't get great light anyway, because it faces north and looks out onto our covered porch. I'm learning from my mistakes and giving these guys prime real-estate by all the south-facing windows my house can offer. I've got one on my nightstand (pictured above) and the other in the breakfast nook (aka the laundry room, pictured below). Since the temperatures are starting to drop I was careful not to place them too close to the window, where they could catch a cold and die. 

Jade plant getting sun in the laundry room

Water sparingly.

Are you noticing a theme here? Just like all the other plants I got, jade likes well-drained soil and infrequent waterings. I think I took this advice a little too close to heart last time...crystalized stems probably equal "thirsty" ... just a guess. That being said, you're supposed to water more in the summer and less in the winter, so for now I'll leave these guys alone and hope for the best. I mean, I'll give them a little water every few weeks.

fertilize every 3 to 4 months.

In the spring I'll add fertilizer to the soil to encourage growths, and then again in July or August. I definitely didn't do this with my last jade plant, and I think that expedited her swift decline.

Dust when dusty.

These guys are right behind the fiddle leaf fig in my new dusting routine!

Chance of survival in my house:

I'm feeling cautiously optimistic that my last jade experience was enough to scar me into properly caring for these little ones. Odds are decent.

So now you've met the whole fan-damily. I'll report back every now and then to let you know how they're doing, what they're wearing, and any grand adjustments I've made to keep them alive. If you've got plant advice, please lay it on me in the comments!