Show Me Sand the Floor... Show Me Stain the Deck

Last weekend Eli & I finally got a few dry days to stain the deck and it turned out to be quite the task! Eli took a timelapse of the whole process and while it looks easy peasy in hyperspeed, just know that it took enough time (& photos) to burn through 3 memory cards & 4 camera batteries! Take a look...

Halfway into the first coat I was feeling like Daniel-san in Karate Kid... you know, when he thinks he's almost done & then realizes he's no where close.

Our deck was newly built before we bought the house & it was one of the biggest selling points for us. Our last apartment was beautiful & modern but had virtually nowhere to hang out outside. We started feeling (and looking) like vampires who never saw the sun. Now that we have a deck, we practically live out there. It's where we hang out with friends, chat with our neighbors, drink coffee, eat dinner.... I'd sleep out there if mosquitos weren't a thing. In short, it's our favorite place. It's time to make it look as great as it feels.

Because the deck was built with new pressure-treated wood, we had to give it some time to acclimate before we could stain and seal it... I'm fairly confident the last year & a half was sufficient! Sure, we didn't need to wait that long, but we were having too much fun to take it out of commission during all the great weather. Now time is forcing our hand and it's a race against the clock (I told you!) The deck spent a lot of time under snow last year, so we gotta protect it before another winter swoops in to wreak havoc!

I fully expected staining the deck to be a weekend project but before we knew it it was Thursday morning & we were still at it. #CantStopWontStop In reality a majority of that time was waiting for stuff to dry & then waiting out the rain & then waiting for stuff to dry again. Let's hope we learned our lesson to start early!

Saturday morning we went to Home Depot to pick up supplies...

We used Behr Premium deck cleaner and stain

... and $150 later we hunkered down and got to work. 

Step 1: Clear off the deck

This was a great excuse to get rid of all the junk that had accumulated over the last 16 months. We don't have a garage or shed, but we still have lawn care tools, grass seed, wood scraps, etc. Without a good place to store all that stuff, our deck turned into an accidental open-air shed, and it was not a good look. Our favorite place shouldn't be an eyesore! Once all the stuff was gone & we'd swept, we were surprised by how big the space felt again. Note to self: must find a long-term outdoor storage solution.

Step 2: Deep cleaning

Before we could start applying any stain, we had to give the wood a thorough refresh & try to lift bike grease spots & other battle wounds our deck had collected over the year. We followed the directions on the bottle and hosed everything down with water. Then we diluted the cleaning solution in the pump sprayer with one part water to one part cleaner and sprayed our mixture all over the wood.  I wore gloves, close-toed shoes & glasses to protect my skin & eyes from the spray.

Step 2: Spray Behr Premium all-in-one wood cleaner over the deck
Use a pump sprayer to apply the cleaning solution

After I'd sprayed all the posts, railings & boards, I poured some of the undiluted cleaner directly onto the grease stains in hopes that it would lighten them better. I let it sit for about 15 minutes to do its thang and then scrubbed the whole deck with a stiff-bristle deck brush – really laying into the dark spots. Then I wasedh it all away. It did a pretty good job brightening the wood & the bike grease was less noticeable (though not gone altogether). The scrubbing and rinsing took longer than I expected – keen observers may have noticed it was absent from the timelapse. That's because it got dark before I finished & we drained the first camera battery! Whoops! 

Step 3: Let the deck dry completely

The wood has to be 100% dry before you can apply any sort of sealant. I went to bed nervous on Saturday night that it wouldn't be dry enough for us to stain on Sunday since I didn't finish rinsing til after 8 o'clock. Luckily Sunday was living up to its name & our south-facing deck was totally dry by about 1:30pm.

Step 4:  Apply first coat of stain

Eli and I each grabbed a brush and set out to divide and conquer. First target: rails & posts. I squeezed between the fence & our deck to get the outside edges while E focused on the inside faces that we'd actually see everyday. I felt like a contortionist bending every which way to get the bottoms of boards because we aimed to coat all six sides of every piece of wood. Woof. I felt like an old lady that night – my lower back was killing me! We were really surprised by how much stain it took just to do the railings! About a half gallon for the first coat. We forgot to factor them in to our square footage calculation when deciding how much stain to buy, so Eli had to run back to Home Depot to get another gallon.

Meanwhile, I started on the floorboards. I used an applicator pad that screwed onto my broomstick & took it slow-n-steady. Because I was applying a thin coat, the stain dried pretty fast & I had to be careful not to overlap too much where I'd already applied because each pass would make it darker. I took it one board at a time – sometimes two – going from one end all the way to the other end. The directions on the can advised doing it this way so that the boards would have a consistent coloring and the whole deck wouldn't look patchy. 

We used the Shur-Line applicator pad to apply stain to the deck's floorboards

My applicator pad had a built-in "groove tool" that you could extend down, and it was supposed to get the cracks and boards in one fell swoop. Sounds great in theory, less so in practice. It was awkward to flip the tool down, difficult to dip it AND the pad into the stain, and even when I could do all that it simply wasn't very effective. The cracks were either too wide for the groove to reach the edges, or too narrow for the groove to fit at all. I gave up trying after the first couple boards – you can see the cracks are bare in the shot above. It's best to have a second person follow behind you to get those with a paint brush and to brush away any pooling stain. The applicator pad is pretty good at spreading stain evenly so it doesn't pool, but putting it down and picking it up from the wood leaves visible marks that you have to brush away.

Step 5: Apply second coat of stain

Behr's stain is supposed to dry for a couple hours before you start a second coat, but we were losing daylight fast. Staining is not one of those activities I like doing by porch light, so we called it a night & hoped to find time to finish during the week. Of course, there were a few torrential rain storms that really screwed up scheduling (& necessitated another Home Depot trip to get a huge tarp) but we finally got back to work Wednesday (for rails/posts) & Thursday (for floorboards). The second coat of stain goes a little faster than the first – especially because it's supposed to be suuuper thin. 

our deck stained in Cordovan Brown

Step 6: Wait for it to cure

Behr recommends waiting 72 hours for the stain to fully cure before replacing furniture, etc. We just finished staining yesterday, so we're still in the waiting period. Aaaaand it's raining again – let's hope this "weatherproofer" really works! The rain droplets look like they're beading up rather than soaking in, so that's a good sign. 

Strictly speaking looks, I really like the darker wood. I choose to go dark because we learned early on that we were prone to stains (hello, bike grease) – so we wanted to be able to camouflage those and not have to worry about actually using our deck. Pay no mind to our gardenia that was murdered by a groundhog or the overzealous citronella plant ... nothing to see there! I mentioned earlier that we would stain the AC cover Eli built from a bed frame when we did the deck – but as you see it's glaringly absent in the "after" photo. We quickly realized we didn't have enough space or time to do both at once – there was no where for us to rest the cover without killing the grass. After the deck is fully cured & our arms fully functioning again we'll tackle that.

In the meantime I'm brainstorming ideas for how to style it up. I can't wait to get my favorite room back!

This post was not sponsored in any way, I'm just a girl on a mission.


Trying Not to Ruin the Wallpaper

It's done! It's done! The powder room is done!

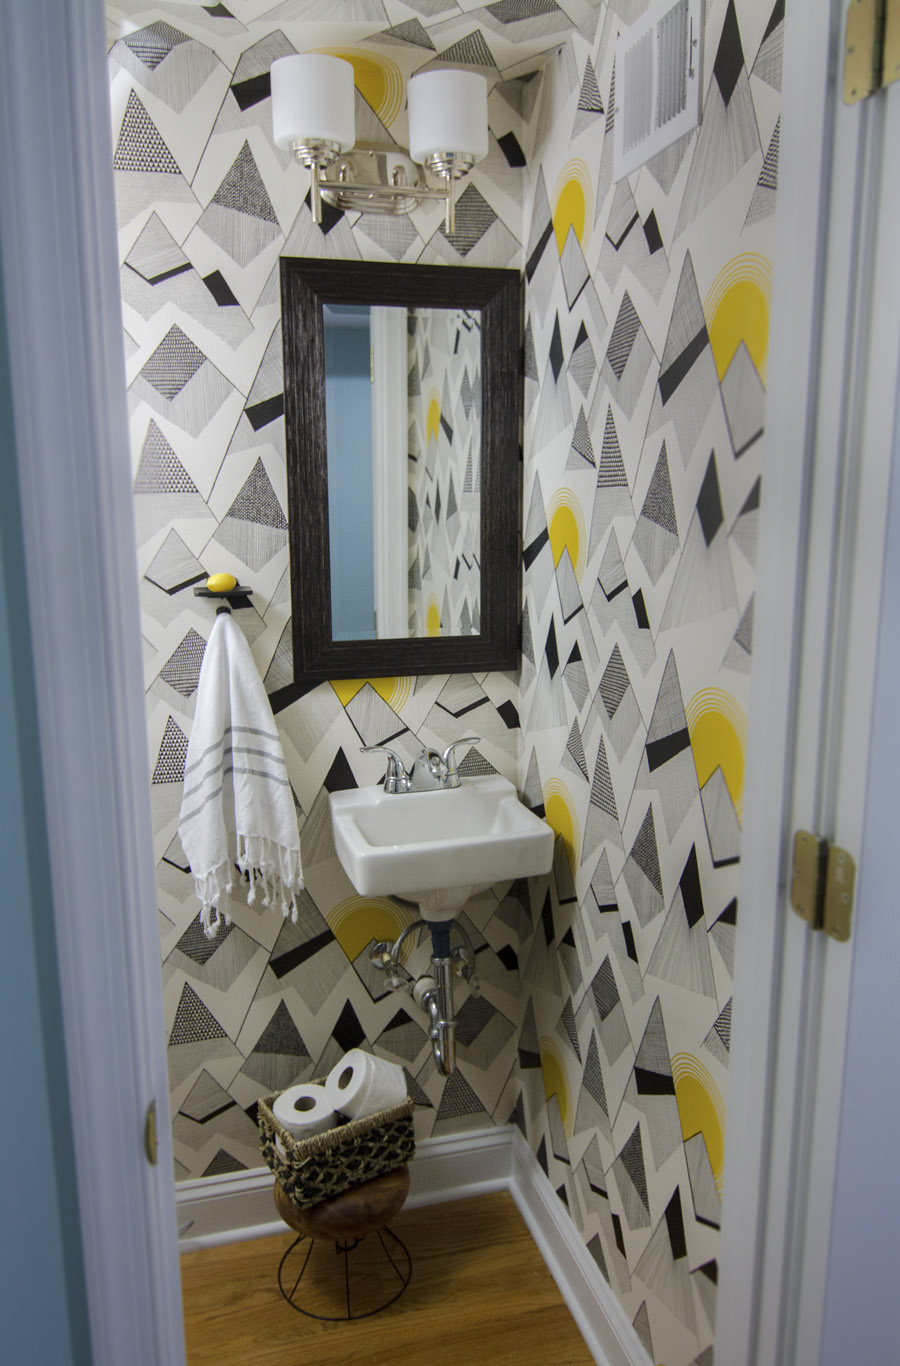
Wallpaper is "Mountains" by Miss Print courtesy of Wallpaper Direct, soap dish & hook are from Signature Hardware, and mirror is from Homegoods

If you’re confused because you saw me finish the wallpaper 4 months ago, then that makes two of us. What feels like an eternity in blogging years was double that IRL (that's 8 months, in case it's too early to be doing math where you are). And yet the powder room was still not finished! What was the hold-up, you ask?? 

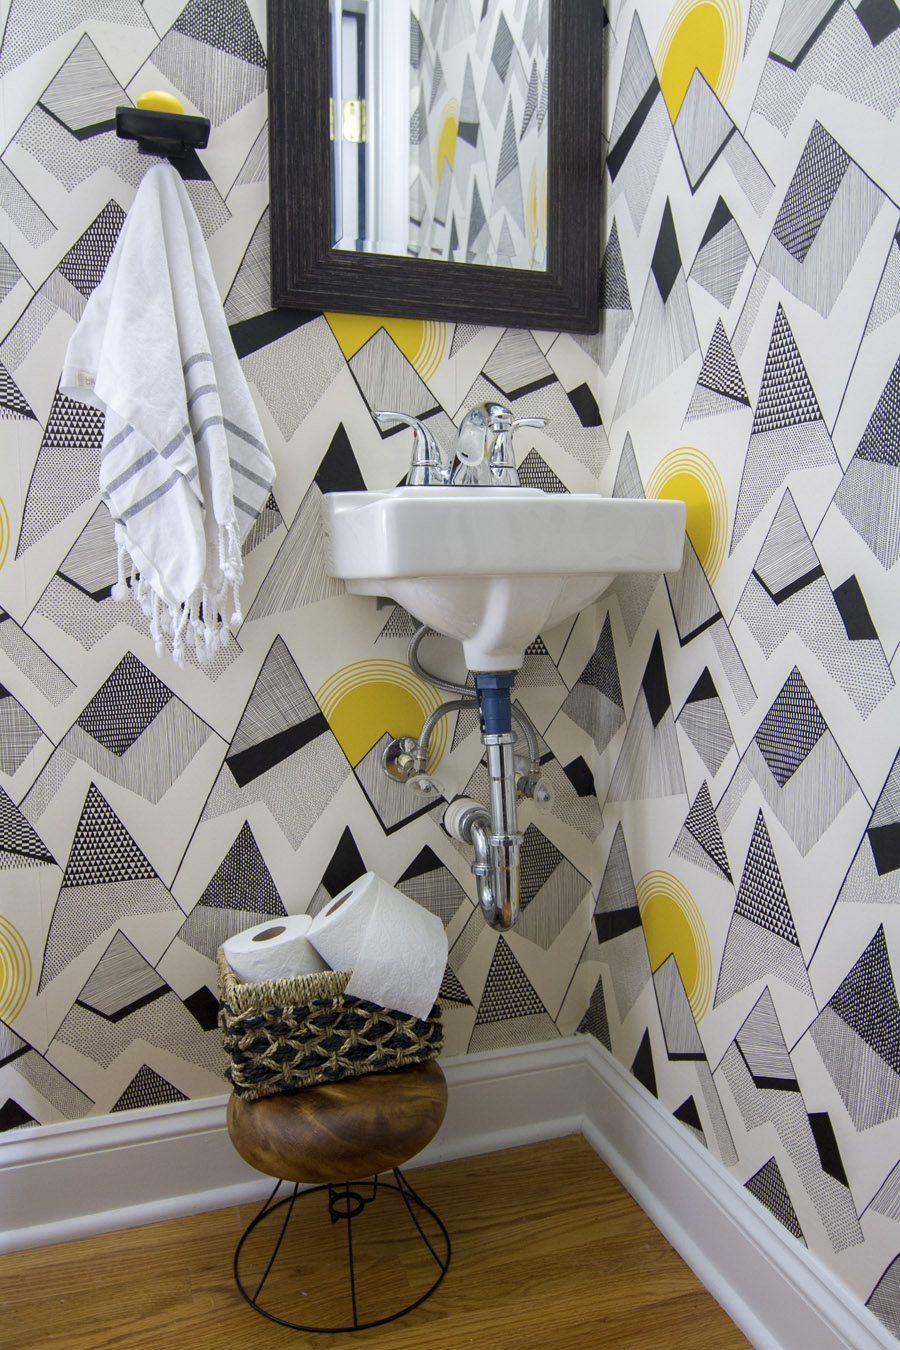
Gardenia soap dish form Signature Hardware & "Mountains" by Miss Pixie wallpaper

A spot for the soap & hand towel. A small thing, I know – & yet so important. I should probably be embarrassed, but I’m too busy being relieved. It was like running the race of my life and then crawling the last 20 meters in Crane Pose. Anti-climactic much?

I've never given much thought to the soap & hand towel sitch in other bathrooms. The soap goes on the counter, the towel goes on the towel bar. #NoBrainer And yet suddenly it wasn't so obvious once I found myself with a doll-sized bathroom, a doll-sized sink and wallpaper that I'm terrified of putting holes in. What I really wanted was this mirror from Anthropologie (or this one!) with an attached shelf for soap because that would be a 2 birds 1 stone scenario – but I couldn't bring myself to spend $300 on a mirror for the powder room. Maybe someday...

I was driving myself crazy looking at affordable options & liking none of them when I stumbled upon these little cuties on Signature Hardware’s website. They were simpler and more rustic than anything I'd considered before, but I think that’s what I liked most about them. The wallpaper is the true star here, and these guys are perfectly happy to be out of the limelight and revel in their understated charm.

      Gardenia Soap Dish

      Gardenia Soap Dish

 Solid brass hook with porcelain knob

 Solid brass hook with porcelain knob

I was gonna have to suck it up and put some holes in the wall. Four to be exact – enough to nearly give me a heart attack! So I did what any normal person does when they think they're having a heart attack – I consulted the all-knowing interwebs. Obviously. Experts seem to agree on this method for protecting the sanctity of your wallpaper: cut an upside down V in the wallpaper, peel it down and put your nail hole directly in the drywall. Then, when you decide to move whatever was hung there, you should be able to paste the paper flap back where it was for a seamless repair. It sounds pretty clever – but I'm hoping I never have to find out if it actually works. I just went with it, and so far so cute.


Signature Hardware's Gardenia soap dish & solid metal hook in oil-rubbed bronze

All the success stories I’ve read to date talk about using this trick for itty bitty nail holes. I, on the other hand, needed some big honkin’ craters for drywall anchors and screws. That complicates matters because any repairs would require me to remove the anchors, spackle the gaping hole where my heart used to be and sand it down to be level with the drywall I can no longer see – all without messing up the wallpaper. Should be fun! This is either a really dumb idea, or it’s a perfect example of "scaling up." Don't worry, guys. I have some spare paper lying around if things go totally bananas.

If you have wallpaper and feel like taking a leap of faith with me, here’s how I hung these fixtures:

1. I started by choosing a position on the wall. This gets its own step because what's usually a simple task feels like a high-stakes gamble when wallpaper is involved. I wanted the soap & towel to be convenient to reach when standing at the sink so guests don't have to bend down, reach up, or smush their arms like a T-Rex to dry their hands. I also wanted them to sit at a point in the pattern that would help me camouflage future hypothetical repairs.

Powder room complete with Signature Hardware soap dish & towel hook as well as Miss Pixie's Mountains wallpaper

2. Next, I leveled the hanging plate and just barely marked my holes with pencil. When I say "just barely," I mean my mark could have been confused for a microscopic dust particle. It’s a miracle I could see it at all.

Use a level to mark the position for a soap dish

3. Then I held my drywall anchors up to the wall & centered it on the microscopic-dust-flake-of-a-mark to determine how big of an upside-down V I needed to cut. The answer, to my dismay, was “Really big.” : [

I held the drywall anchor up to the wall to mark the size of the cut in the wallpaper

4. Then for the “Here goes nothing” moment — I used an Exacto knife to cut the upside-down V big enough to comfortably surround the drywall anchor on all sides....... What's done is done.

5. Gently, carefully, nervously I peeled the wallpaper back from the wall and bent it down. My two cut-outs looked like evil Jack-o’-lantern eyes saying, “What have you done?!”

I peeled back the wallpaper to make room for my drywall anchors

6. Then it was time to bring out the big guns, and by guns I mean drill. I drilled 1/4” holes on my original marks and then screwed in the cool drywall anchors that came with my soap dish. Those eyes just got a little creepier...

Drywall anchors in

7. From there it was a matter of attaching & adjusting the hanging plate so it was level. I screwed it in most of the way, checked the level and then tightened it down. The actual soap dish hooked onto the plate with a little screw. 

I used my drill to drive screws into the anchors

It was essentially the same dealio for the towel hook, but with smaller holes and cutouts. Thank god. So there you have it. This room is fully functioning now! And my little Low-Cost-And-Found stool that I made from a lampshade is doing a fine job holding that extra toilet paper!

The powder room is finally finished after adding Signature Hardware fixtures for hand soap & towel.

This entire powder room makeover cost me less than $150, and the results are not too shabby if I do say so myself! It wins the honor of being the first "finished" room in the house. Also the smallest. ; ] Huge thanks once again to Dana Miller of HouseTweaking & Wallpaper Direct for gifting me this awesome wallpaper. The pattern is "Mountains" by Miss Print. 

Low Cost & Found: A/C Cover From a Bed Frame

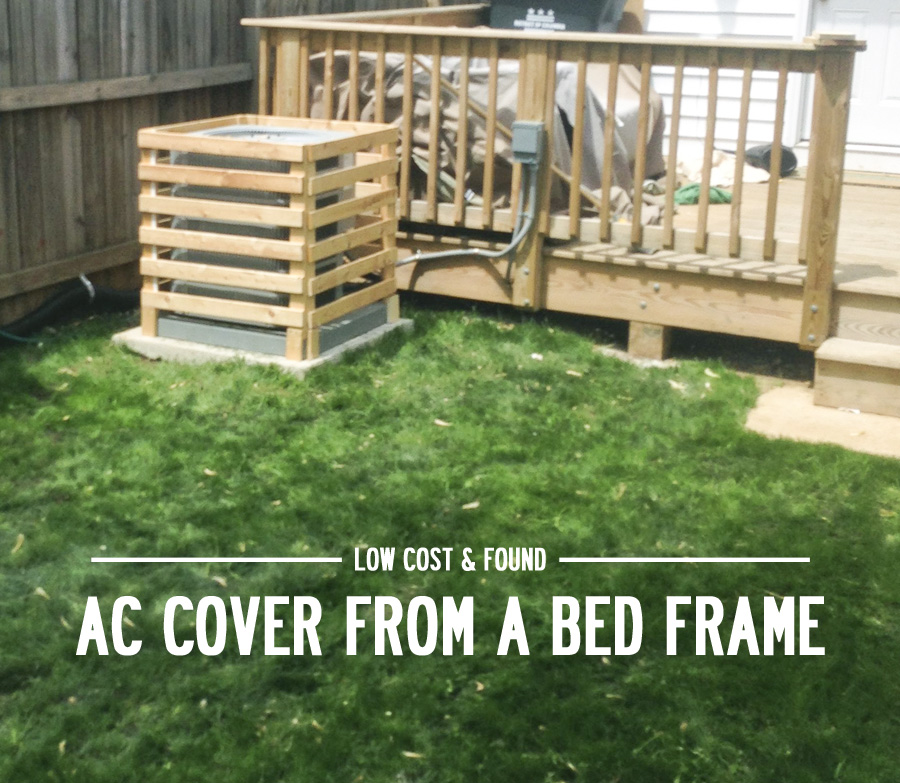
Someone recently informed me that it’s now fall… Exsqueeze me while I screech this record player to a halt. What the heck happened to summer soirees and pool days? Fall is beautiful and all, but it’s the start of a mad dash to finish our outdoor projects before the cold sets in. Perhaps you can relate – unless you’re in LA and have nothing but time and good weather, in which case, why rush? Next week we’re hoping to stain the deck (weather permitting), and when we do we’ll also stain this sweet A/C cover Eli made a couple months ago.

How to build an AC cover from wood bed frame slats

[Let's all just pretend we don't see the mess on the porch – mkay? Avert your eyes to the AC cover and that soft billowy grass! Don't you just wanna curl up and take a nap in that meadow?]

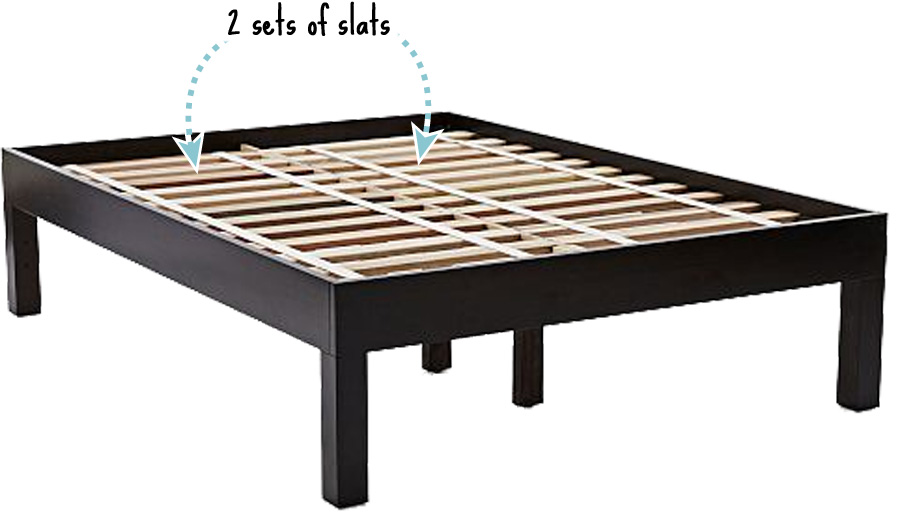
I usually play the role of DIY aficionado in our house, but Eli takes the reins every once in a while to show me what’s up. To be honest, I don’ hate it. One day when I was out of town he repurposed the wooden slats from our bed frame into a cover for the eyesore that is our A/C unit. You may remember that we converted our West Elm platform bed to hold a boxspring and no longer needed the slats that came with it. Rather than throw them out, he came up with this quick, easy & environmentally responsible DIY. Good work, Eli! What's even better is that all he used was a drill & some wood screws.

Our bed frame came with two sets of ~30" long slats – conveniently a few inches longer than both the width & height of our a/c unit, so we didn't need to make any cuts. Small victories! Each slat was attached to the next with some simple webbing that spaced them about 2.5” apart when laid out – a useful guide when it came to screwing the cover together. 

To start, Eli used a knife to free up 8 slats from the webbing – 4 from each set. I recommend using scissors instead of a knife cuz I like having 10 fingers & 10 toes, but Eli lives dangerously. These free pieces would become the vertical ends to form the box corners.

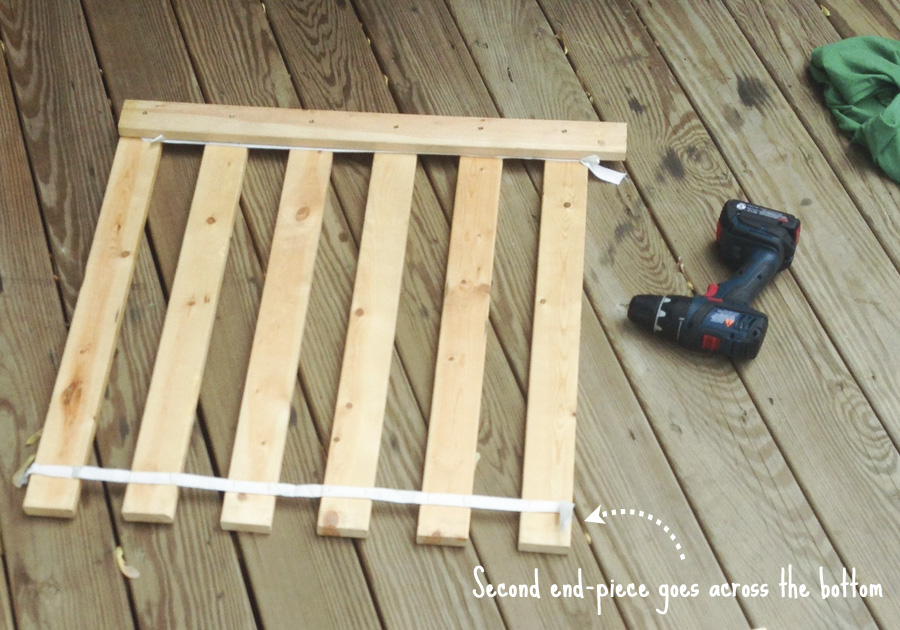
Then he laid out the remaining connected slats and lined one of the free pieces of wood across them perpendicularly to determine how many slats it would span. The answer for us, my friend, was six. He cut the webbing after every sixth slat to give us 4 sets of 6 attached slats. He laid out a section (helps if the webbing is facedown), overlaid an end piece across the top, and used screws to attach it to each slat. Then he lined up another end piece across the bottom and did the same. He rinsed and repeated for the other three sides of the cover.

Create an AC cover from wood bed-frame slats

Once he had his four sides assembled, he stood up two at a time, squared the corner, and drove a few more screws through the vertical pieces to connect them all. It helps to pre-drill the holes so you don't split the wood, and he earned a few extra credit points for using a countersinking drill bit so the nailheads sit below the wood's surface. If we're feeling ambitious we may putty those holes before staining, but it's just an outdoor utility cover, so I'm honestly not too concerned about hiding screws.

Eli squared the corners and attached the sides of the cover using simple wood screws

After all the wood slats were secured, he cut away the rest of the webbing. There he goes living dangerously again...

Eli used a knife to cut the webbing when creating the cover for our AC unit

And that was pretty much that! He just set the new wood cover over the unit, and BAM! Our a/c is now camouflaged to blend in with its surroundings. We didn’t attach it to the unit or the ground in any way and haven’t had any issues of it blowing over or moving. Added bonus: we can easily lift it off if we ever need to do any cooling repairs. The simpler, the better!

The final product is a simple wooden box that sits over the AC unit but allows plenty of breathing room for high performance

The cover gives the unit a few inches of breathing room on each side, and the space between the horizontal slats is wide enough that I don’t worry about hindering a/c performance. 

I'll make sure to post new pictures after we get everything stained. We just need a few consecutive rain-free days in the forecast before we can check that off the to-do list. Personally I was really impressed with Eli’s zero-cost solution for a common backyard problem. What have you guys tried to hide the ugly gray box?