Plans for the kitchen & dining area

Every time we finish a big project we like to take some time to breathe, enjoy the house being back in order, admire our handywork, and evaluate what we should tackle next. If I'm being honest, I'd say the lull between our last project and the next one is really 20 percent strategic, 20 percent day-job busyness and 60 percent exhaustion : ] I mentioned back when we were painting the kitchen cabinets that paint was just the first step – oooooh, was it – there is still a scary amount of work to be done. For instance, the second half of it on the opposite wall....

Here's the plan for the other side of the kitchen

Namely:

  • Install a tile backsplash (after choosing a tile, of course)
  • Install under-cabinet lighting
  • Build in the fridge, like this.
  • Create a pantry to the left of the fridge (again, like this)
  • Add lower cabinets on the right side of the fridge
  • Install a floating shelf or two above the new lower cabinets
  • Find an old, small island on casters so we can chop veggies without staring at the wall
  • Refinish the hardwood floors to eliminate the yellow
  • Spruce up the dining room with art and a rug (and remove the rug from the kitchen)
  • Convert the can light over the table to a chandelier

Next week I may ask for your help in choosing a tile backsplash, which is our next big to-do, but first a little inspiration for the dining room because a) that's much more relaxing to think about right now and b) you may need to see the vibes I'm striving for to choose the right tile next week! Since the first floor is essentially one long room, the kitchen, dining area and living room all need to relate to each other stylistically.

Here's the view of the kitchen from the living room

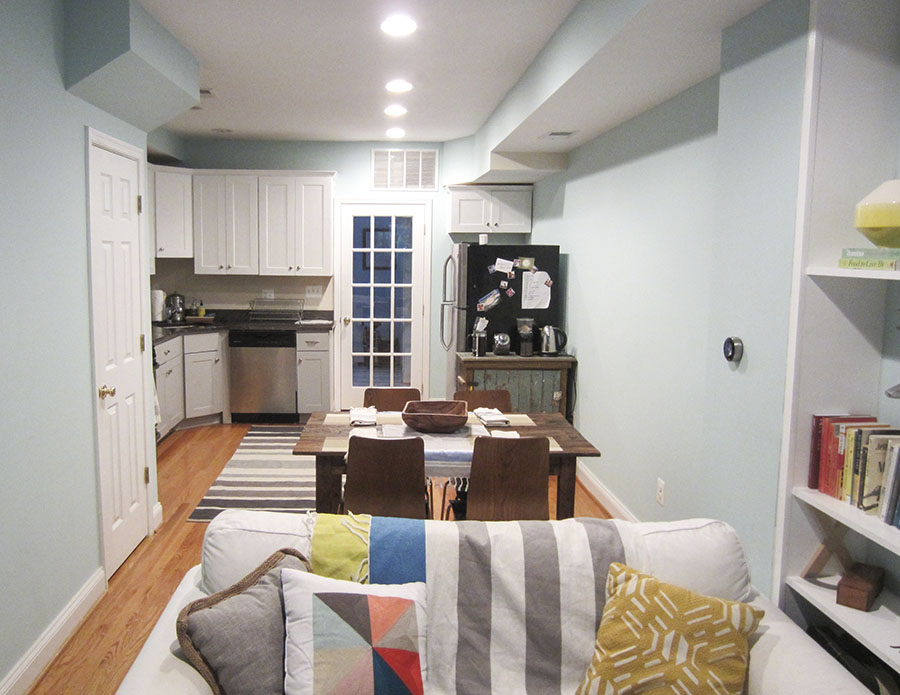
The dining area is a actually just a small segue between the kitchen and the living room. Currently its defining characteristics are a table and 4 chairs – pretty standard stuff. People only sit at the table when it's time to eat, but given its close proximity to the kitchen, it would be nice if it became more of a magnet for friends to congregate and socialize while dinner is being prepared (...y'all know I don't cook, but Eli does all the time).

Here's the view of the dining and living areas from the kitchen

As I said before, the first floor is open and small, so the rooms need to have a cohesive style. That doesn't mean everything needs to be color coordinated (though color palettes are your friend), but really the vibe just needs to feel consistent. When I walk through my front door I want to feel like I've arrived at my oasis on the coast, like if there were more open windows I could hear the waves crashing in the distance instead of sirens blaring through the city streets. An escape, if you will. "Beachy" can start to look kitschy real fast, so my plan is to temper it with modern accents and hits of black. 

A mood board of the beachy yet modern vibe I'm striving for in the dining area

1. Large Prism Chandelier | Shades of Light

There's a can light conveniently centered above the table that is just BEGGING for a dangly chandelier necklace. I'm convinced that converting it to hold a bold light fixture will really be the gamechanger – anchoring the table and making the dining area feel intentional. I love this black geometric chandelier for many reasons, but mostly because a) it's a bold contrast to all the white, b) it's funky, and c) it's airy enough that it won't obstruct the view from the kitchen to the living room.

2. Monterosso photo | Gray Malin

I'm obsessed with Gray Malin's photography, and I want to hang a really massive print like this one on the wall to the left of the table if you're looking at the last photo of the room. Unfortunately I am so far from being able to afford the size I want, so either this will show up on some future gift registry or I'll ask Eli to take a similarly gorgeous and relaxing beach shot on our next vacation.

3. Barnwood table |  Salt & Sundry

Salt & Sundry is another local go-to shop (will feature it soon), and this table was built by the shopowner's daddio in Cary, NC. It's rugged, rustic and petite, but easily seats 4 people. Plus, North Carolina holds a very special spot in my heart, making this table that much better. I bought this a couple months after moving in so we could stop eating on the couch.

4. White upholstered chairs 

I want to lighten up the table area by bringing in some fresh white chairs in an easily wipeable finish to complement the wooden ones I've already got. The ones seen here are from Dot & Bo for $350, which is about $300 more than I personally like to spend on a chair ; ] Sooo, I'll be hunting for a more affordable alternative.

5. Wood chairs | Persistent yard sale at 9th and K NE

The wood chairs were a discount find at a weirdly awesome yard sale in DC – weird only because it's open every day in some guy's front yard (I think his name is Reggie?) I paid $60 for the set of 4! The wood chairs + wood table is a lot of wood, but I kinda love it and the contrasting styles (mid-century and rustic). The white chairs and other accents will help to break it up.

6. Table runner, napkins, bowls | West Elm

This stuff is really easy to switch out whenever the mood strikes (or the season changes). I like this white and slate runner because it ties in with the black chandelier while still remaining easy breezy, and the napkins and bowls grab some of the coral from the beach umbrellas in the photo.

7. Area rug | Dot & Bo

An area rug is another one of those items (like the chandelier) that will help to ground & define the dining area. When choosing a rug, I'll be looking for something that's very easy to clean so the ravenous animals in the house (aka Eli & I) don't have to worry about stains from dropping food. I like the pattern of this imperial stamp rug (and that it ties in with the black accents), but it's probably too high maintenance in terms of cleaning so I'll be searching for something more food-proof.

8. Refinished floors

The persistent element on the first floor that makes me crazy is the yellow oak floors. So while this update is not specific to the dining area, I included it here so I can picture the whole transformation in my head and reassure myself that the floors won't be yellow forever. (A change gon' come!) Refinishing the floors is going to be a whole big process, which is why we haven't done it yet, but I think the house will look so much better once it's done. I haven't decided on a stain yet, but I like this dark walnut color. The darker floors might tip the balance between the wood table and wood chairs to "Whoa, that's a lotta wood!" so the rug will be important for breaking up the lumber show.

I'm excited to have this mood board for the room as my road map to a beach oasis in the city, but most of the stuff there is way more than I can afford right now. I'll be searching for similar pieces that fit into the plan at a price I can stomach. Rest assured, I will update you when I find them! 

Happy Friday, friends! All this beach talk has me itchin' for a vacation before the summer is over. Anyone else escaping to the coast?

Low Cost & Found: How to Make A Stool From a Lamp Shade

Happy Monday, folks! My most sincere apologies for missing Friday. The week was cray – news was breaking at work, my computer was breaking at home – it was brutal. My hard drive crashed, and it would have been complete devastation if not for Eli, my man of many talents who spent many hours salvaging my files (and forced me to backup in recent months). Watching him do surgery on my computer is a thing of beauty (think computer innards exposed, tiny screws everywhere, miniature screwdriver in hand). So here we are... Monday... perhaps the worst day of the week. Let's hope I can cheer you up with a fun and simple DIY!

Supplies you'll need for this DIY to turn a lamp shade and wooden bowl into a decorative stool

Two months after sharing my wallpapering adventure, the powder room is STILL UNFINISHED. It's missing two things which are so small and at the same time so important: a hand towel rack/soap holder combo and a stylish stool (more like a miniature side table) on which to set extra toilet tissue for guests, and (perhaps more importantly) add a little styling je ne sais quoi in the room. I had a very specific image in my head of what the stool should look like but after months of looking I concluded it does not exist in the correct dimensions and price range, and so begins a game I will henceforth refer to as Low Cost & Found. It's bascially the MacGyver of DIY, in which I pilfer odds and ends from around the house, pick up some cheap supplies at the hardware store, and put them all together.

In this case, I had a beautiful wooden bowl from Homegoods ($14), a small lampshade that was about 6 inches tall and 4 inches wide across the top (you can find them at Goodwill for $1), a metal cup for holding paper clips, a Union Jack-patterned aluminum sheet ($10 at Home Depot, and enough for several projects), and some 22-gauge floral wire that was laying around the house. With the help of some cutting & bending apparatuses, some spray paint and super glue I made this... no power tools necessary.

A DIY project, making a stool from a lampshade and a wooden bowl

It's business up top and party on the bottom. I wouldn't stand on it – nor should you or your kiddies (it ain't made for that) – but for a pint-sized decorative stool, he's pretty cute. 

The first step in making it is to free the wire-framed lampshade from its dingy cloth cocoon. I removed it with scissors and then scraped off some really lovely, yellowed glue with my nails and a wet paper towel. I’m not sure whether these old metal frames contain lead (?), so if you do this at home take proper precautions. 

Step 1: Cut off the fabric lamp shade cover
Step 1: After cutting off the cover, give it a slight yank to remove it from the glue
The lamp shade has been cleaned down to its wire base and is ready to move on to the next step.

After cleaning the frame, I applied a thin coat of Rustoleum spray paint in a matte black. It’s paint & primer in one and is well-suited for metal. I let it dry outside for a couple hours.

Step 2: Spray the lamp shade with two light coats of Rustoleum spray paint. 

While the spray paint was drying, I marked the outline of the wooden bowl's rim on the aluminum sheet and cut around the circle with my gardening shears (err i mean, metal snippers... don't tell the gardening police). Then I used round-nosed pliers to roll the sharp edges down...giving the circle a curved edge that will fit nicely inside the bowl. I tested to see if the aluminum would fit inside the bowl as I went along, and stopped bending it when it could sit level about an inch below the outer rim. I decided to spray paint this aluminum black, but the silver would have been a fun look, too.

Steps for preparing aluminum sheet

I used a tape measure and Sharpie to mark the center of the bowl, applied a big glob of superglue, and then carefully placed the paperclip cup on my mark, dead-center. I piled on some books and heavy objects to weight it down and let it dry for an hour or so. The bowl had a nice flat bottom, so the cup was able to sit totally flat and level.

Step 4: Mark the center of the bowl and spread super glue to adhere the paperclip cup

This step was only necessary because the depth of my bowl and short stature of my lamp shade meant that my overturned bowl would cover half the shade when stacked on top. Goodbye, lovely curves! It's all about size ratios here and while the stool needed to be short, I didn't want it to look squat. I considered other options besides the bowl – for instance, if I used a round butcher block cutting board instead I could have just screwed it onto the base with some metal braces and called it a day. Unfortunately for me, I really fell for this bowl and decided it was worth the extra effort. So here we are with a total MacGyver move – supergluing a paperclip cup to make the bowl shallower, and hence saving the lampshade from being swallowed up when I stack them together later. Think of it as the bowl's booster seat. :)

Step 4: Attach paper clip cup to the center of the wooden bowl using superglue

While the cup and bowl were getting to know each other, I also applied a thin line of superglue around the top rung of the lamp shade and centered the aluminum sheet circle on top with the curled, jagged ends facing up. This time I used a jar full o' rocks to weight it down and dry, since a book would have gotten glued thru the cutouts in the aluminum. After it dried, I came back with some floral wire, threading it through the cut-outs and around the lamp shade's top rung to make doubly sure the two were secured. I then applied another thin coat of spray paint to the underside of the stool – covering the silver aluminum and green floral wire to get a cohesive matte black.

Step 5: Superglue aluminum circle to the top of the shade
Step 5: I also used wire to doubly secure the the aluminum sheet to the lamp shade

I used my pliers to twist the wire super tight... that baby was goin' no where. Make sure your aluminum circle is centered and level over the shade, because the paperclip cup and bowl are going to rest on top of it to make the top of the stool.

Step 5: Use pliers to tightly twist the wire

The last step is to attach the base and the bowl. I applied a last strip of superglue around the edge of the paperclip cup and carefully fit the bowl over the aluminum sheet, pressing down firmly when it was centered and level. 

Last step is to attach the lamp shade base to the bowl top.

Then I came back with some more wire to thread through the aluminum cut outs and the little holes in the paperclip cup. This was a little tricky (and perhaps not totally essential) because the holes in the cup weren't all that visible behind the aluminum sheet, and they were small to begin with. I used the wire like a fish hook and fumbled around a little til I got it through a hole. Then I twisted the ends tightly, snipped 'em close to the base, and used a Sharpie to color them black. Ooo, tricky, trick-ay.

A close up of the wire that I colored black and used to secure the lamp shade base to the paperclip cup/wooden bowl.

And there you have it, folks! An adorable little stool made almost entirely from stuff I found or picked up on the cheap. Look how perfectly it presents the spare TP!

Finished product in the bathroom

Sure, there aren't any small animals in the house to appreciate the cuteness of the underside, but I'm always prepared...just in case.

View from below: the aluminum sheet, spray painted black, gives a fun textured look.

The wallpaper is so bright and whimsical (which I'm still lovin', BTW) so the dark, rich wood helps to ground it with a level of seriousness, while the curvy bowl and wire base fits in with the playful nature of the room. 

My new DIY-ed stool, made from a lamp shade and wooden bowl

I'm so relieved that I can stop searching for tiny stools to fit in my tiny bathroom! Now I just need somewhere to hang that stinkin' hand towel! My combo soap holder/towel rack may turn into another game of Low Cost & Found, since I can't for the life of me find what I'm looking for. 

Finished DIY lampshade stool in the powder room

What did you guys get into over the weekend? And fun low cost & founds of your own? Hopefully no computer crashes...

How To Paint Your Kitchen Cabinets

Painting the kitchen cabinets was one of those projects that’s been on my to-do list since we first stepped foot in the house. I guess to some people (Eli, my family, and coworkers – y'know, just to name a few) painting new cabinets sounds silly. Yes, they’re in perfect condition. Yes, the shaker style is modern. Yes, the color of the cabinets "goes with the floors" (OMG, do you think that’s why they chose this floor stain?!)  

Our oak-filled kitchen right before we moved in.

Sorry, back to what I was saying – the cabinets were fine; the oak was just crampin’ mah style. All the wood felt very dark and heavy in a kitchen with zero natural light. I spent weeks – nay, MONTHS – showing Eli pictures of white kitchens on Pinterest (which was thrilling for him, obviously). I was trying to prove it was worth the effort, but instead I proved that natural sunlight beaming on countertops always looks lovely -__-  Do you know how hard it is to find a windowless kitchen on Pinterest for fair comparison?! It’s an exercise in futility. You could turn it into a game if you're really bored, but the judge has to be a photographer who can spot the window cropped out of the frame because there is always a window out of frame. I believe this one and that one are the only kitchens I ever found…

Nevertheless, I eventually made my case and one Saturday morning not so long ago we got to work. If you're following along on Instagram than you already knew this! I selected a bright white from Benjamin Moore called Chantilly Lace for the upper cabinets and a light gray called Nightengale for the lowers to complement our dark purplish/blackish countertops. I thought white would be too stark butting up to the counters and gray would be too dark on top – so two colors it was! In any other house I would opt for a much deeper gray on bottom for higher contrast, but with our space I worried a dark gray would totally dominate the small first floor. In retrospect, I probably could have gone a shade deeper, but don’t tell Eli I said so! ;)

Paint alone made a huge difference in the kitchen

The space feels much brighter and bigger now! Of course, paint was just the first step so this isn't a true "After" photo. We plan to add tile backsplash, under cabinet lighting, refinish the floors, and the fridge wall still has big transformations coming its way, too!

But as kitchen renovations go, painting the cabinets is the biggest bang for your buck. At less than $300 it wasn’t chump change like I thought it would be, but it was way more palatable than the thousands of dollars typically sunk into kitchen renos. Honestly it would have been cheaper had I not spent almost $50 on paint samples just to decide the colors and then when I chose 2 colors having to double supplies like paint, rollers, and trays.

I could type all day about choosing the right grit for your doors and the wipeability of semi-gloss vs. satin finishes, but wouldn't a how-to video be so much more fun? Take a gander, and I'll include some more details at the bottom of the post for the book worms in the house.

Yes, "If you like the video, like it." Gah – Newbie on camera alert! I meant like it on my new Youtube channel! If you need me I'll be spending the foreseeable future doing Ron Burgandy vocal exercises and practicing my non-regional diction. Huge thanks to my (literal) homeboy Eli for putting together the video! 

If you're still dying for more details, here's a supply list and some tips not mentioned in the video. Feel free to ask questions in the comment section, and I'll do my best to answer them!

Here’s what we used:

Supplies you'll need for painting your kitchen cabinets
  • Power drill
  • Orbital hand sander ($60) & detail hand sander (had this already)
  • 220 grit paper for the hand sanders 
  • 80 grit and 220 grit sanding blocks – $4 each
  • Liquid Sanding Deglosser – $7
  • Plastic Tarp & painter's tape to quarantine the kitchen – $10
  • Tarp zipper (optional splurge) – $10
  • Builders paper or dropcloth for the floor – $11
  •  1 gallon of Zinsser Bulls Eye 1-2-3 Water-Based Primer (only used half the can) – $20
  •  1 gallon of Benjamin Moore Advance semi-gloss paint in Chantilly Lace (only needed half a gallon but store was out of quart cans, so they gave me the contractor discount) – $43
  • 1 gallon of Benjamin Moore Advance semi-gloss paint in Nightengale (again, only needed half a gallon) – $43
  • 2” angled brush (one for each us) – $7 each
  • 4” paint roller (one for each us) – $5 each
  • 4” foam rollers (we went through 12, and I’m still kicking myself for using woven instead of foam) – $3 each
  • Mini paint trays (we went through 6) – $2 each

Some tips we picked up during this DIY: 

  • Number your doors and hardware

We numbered our doors and drawer fronts in the hole left by removing the hardware and preserved the label with painters tape. Then we drew a quick-n-dirty reference map of the kitchen to keep track of what went where. We also collected the hardware for each cabinet in its own baggie labeled with the corresponding number. 

  • Careful with the tape

We put down builder paper to protect the floors and put up a tarp wall to protect the living room, but the tape (both painters and gaffers)  ripped up bits of the floor finish here and there. How ironic, right? Weirdo that I am, I was actually happy about this because i think it means sanding will be easy when we go to refinish the floors!

  • Use a sander that hooks up to a vaccum

The orbital sander is the bomb. It's faster and more effective than the mouse hand sander, but arguably it's best feature is that it hooks up to a shop-vac to minimize dust. That was half the reason I got a second sander because I knew we'd have a huge mess on our hands. If you do get the orbital sander, I'd recommend practicing with it on a big wood scrap or something you don't care about before sanding anything precious. I bought it minutes before we started this project and was terrified of ruining the cabinets, so I stuck with the sander I knew and let Eli handle the orbital.

  • Keep an eye on the door edges

Any excess paint around the edge of a door can turn into a drip that adheres the door to the builder paper. There were a couple instances where we had to do touchup sanding and painting because of this.

  • Give yourself time and use thin layers

Painting your cabinets is a lot like painting your nails. Thin coats and adequate drying time are really the secret. This whole project took us 7 days, but we should have allotted 9. We painted one coat per day (prime front, prime back, 1st coat of paint on front, 2nd coat of paint on front, 1st coat of paint on back, 2nd coat of paint on back), but the fronts really needed 36 to 48 hours to cure before flipping them over to do the backs. Because we rushed it, the paper stuck to the paint in a couple places and we had to touch it up. Also keep in mind that we saved a bunch of time and effort by sticking with the same hardware and painting our cabinets while they were still in perfect condition. These two conditions meant we didn't have to fill in holes with wood filler or deal with the anxiety of drilling new holes in freshly painted cabinets. 

Anything else you want to know? Leave me a question in the comments below! And if you paint your cabinets I'd love to see them – just tag them as #CabinetRefresh!  

There's still a lot to do in this room, but it feels so good to finally cross this big project off my list! What do you guys think I should do for the tile backsplash? And I'm all ears on suggestions for floor stains! I'm considering options all over the board, from dark brown to white wash and even gray. Lay it on me!