New "Grayown" Floors in Da House

I can't really put into words how excited I am about what just happened here, so I'l have to settle for this: 

EEEEEEEEEEEEEEEEEEEEEEEEEEEEEEE!!!!!!!!

That's pretty much what Eli and I have been doing since we got home on Thursday night to see our new floors – except in sock feet, obvi! The last 18 months felt like an eternity of waiting to banish the yellow-orange basketball court that was our hardwoods. Dramatic? Yes. But they were so pervasive and affected how I felt about everything else in the house. Having them refinished feels like this huge weight was lifted off my shoulders, and suddenly I feel reinvigorated and excited about the future!

Who knows how much longer I would have put this off if it weren't for you guys helping me decide on a color – so THANK YOU! After we went through that whole process of voting and photoshopping in different options, I was really nervous that I wouldn't be able to translate "grayown" into a real life stain. I dunno about you guys, but I think I got pretty darn close! Let's look at some before and afters, shall we? First stop: the living room! 

Goodbye, Barf Simpson... 

The living room with natural oak floors

Hellooo, Grrrayown 

Our floors after 2 coats of stain
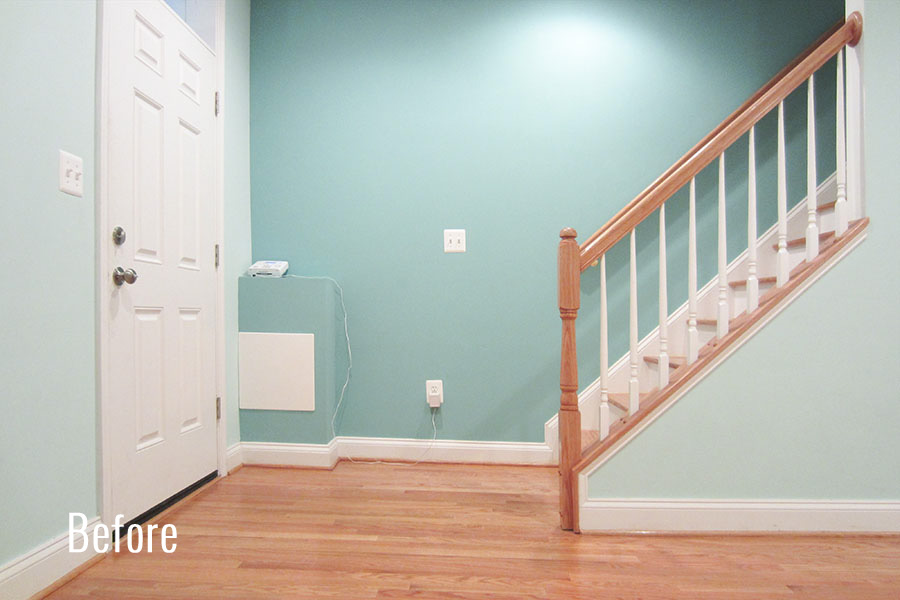
Our entryway and stairs with natural oak floors
stairwell-floors-after.jpg

When I got the quote for the floors, I didn't realize the newel posts and handrail aren't automatically calculated into the cost. I could have paid extra for them to be refinished, but I figured why pay more when that’s something I can handle myself? I know what I'll be doing this weekend! Just follow my lead and ignore them for now.

The main floor with natural oak floors
The kitchen after two coats of stain on the floors

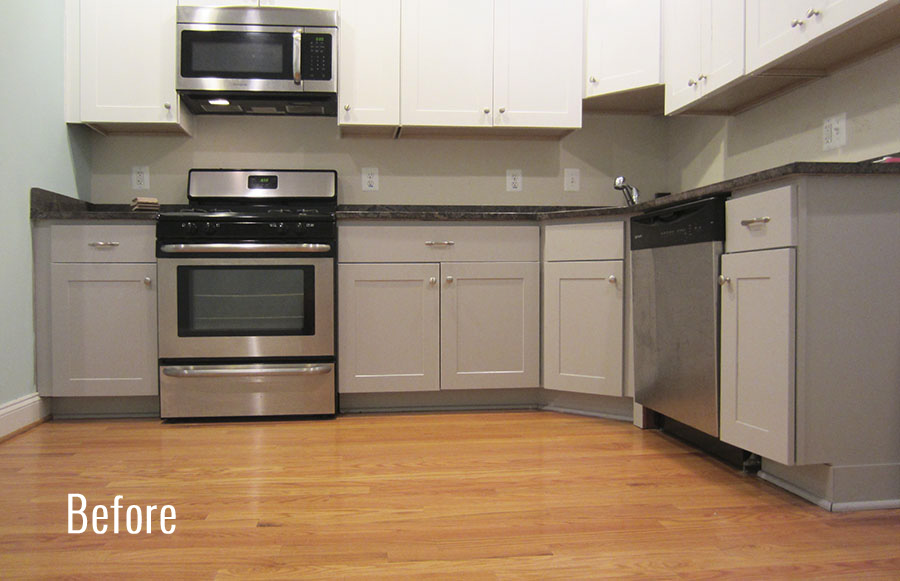
I really love how the color works with the kitchen cabinets we painted back in July. The view down there on the left was the biggest eyesore in the house – I was so elated when we finished painting the cabinets and then so bummed when we pulled up the tarp covering the floors. Without all that shiny orange screaming "LOOK AT ME!" I can fully appreciate our handiwork 4 months later. Plus, I finally feel inspired to install the backsplash and under-cabinet lighting. 

The kitchen with natural oak floors that clashed with the gray cabinets
Our kitchen after 2 coats of fresh stain on the floors

The powder room already won the distinct honor of being the first complete room in the house, but today it's looking even better. The previous yellow matched the suns in the wallpaper spot on ... that was definitely not what I was going for! Now this little room feels calmer and more grown-up. It’s still quirky but it doesn’t look like a funhouse or a tanning booth anymore.

The powder room with natural oak floors
The powder room with 2 coats of stain on the floors

Below is the view from the master bedroom. I like seeing this first thing in the morning to remind me that it wasn't a dream – the floors really are refinished :] Those newel posts are mocking me but their days are numbered, and the walls are begging me to hang artwork ASAP.

The hallway with natural oak floors
The upstairs hallway after 2 coats of stain on the floors

The darker wood just feels so luxurious... like my feet are getting a little treat every time they touch the floor. Have I mentioned that I love it? I really love it. I chose to go with a satin finish on our redo and I'm so happy with the result. It has this coy sheen that is so beautiful in person.

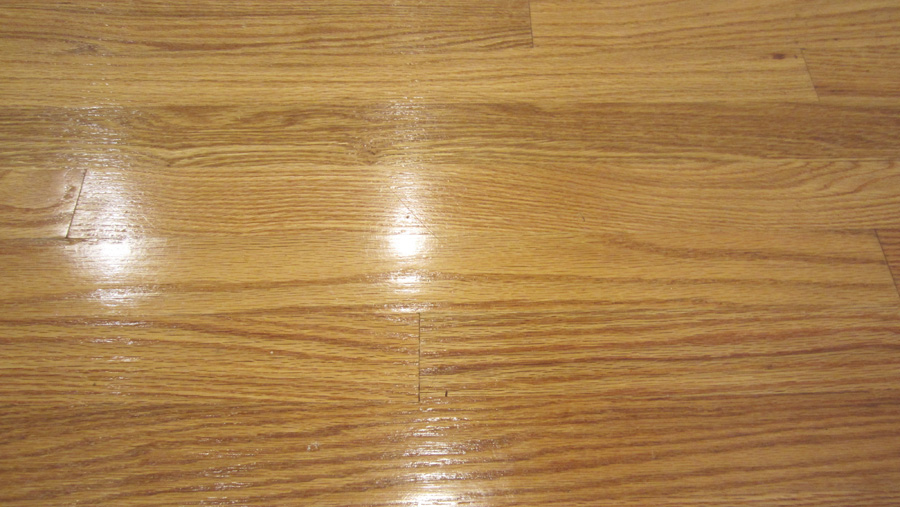
Close up of the floors before
Close up of the floors after refinishing them. They're a mix of Coffee Brown from DuraSeal and Classic Gray by Minwax.

Okay, so that's enough of the ogling for now. Keep reading if you want to know about the process or cost of getting from A to B. Last week went something like this:

  • Sunday (Prep): Eli and I moved our couches, dining table and refrigerator into the laundry room alongside the washer and dryer...our pack-job would get a very high Tetris score. The breakfast nook in the laundry room went up to the guest room, along with the rug and anything else that was breakable. We cleared the kitchen counters and took artwork down from the walls so they wouldn't get covered in dust...the TV stayed up because it's anchored really tightly on the wall and could be covered with plastic. 
  • Monday (Day 1): I met the 3 floor guys in the morning to let them in and finalize the color. (Word of caution: make sure you specify if you think you want gray, black or white stain as those aren't standard colors that they keep in the truck) They removed the shoe moulding and taped up plastic around anything we wanted to keep dust free (like the kitchen cabinets/counters, built-ins and TV). Then they sanded a section of the floors to put down color swatches. I had picked up a floor sample from Home Depot in the color that I liked  (Colfax by TrafficMaster), which made it easier for the guys to match. After we decided on the color, they sanded the entire floor and applied the first coat of stain.
The floor company put a few swatches on the floor so I could settle on a final color.
  • Tuesday (Day 2): In the morning I went by the house to make sure the color was good before they started applying the poly. It was lighter than we'd decided on, so I asked them to apply a second coat of stain. That added about $0.75 per sq ft to the final bill, but I'm really glad we did it.
The floors with 1 coat of stain
The difference of 2 coats versus 1 was subtle, but definitely richer
  • Wednesday (Day 3): The guys applied the first and second coats of poly. I opted for a water-based polyurethane in a satin finish because it dries fast and clear. If we had gone with an oil poly, the floors would have needed a full day between each coat and then more curing time after. Plus the house would have been filled with noxious fumes and the color would have gotten more yellow over time. Oil is the classic standard, but water-based just sounded more appealing to me. Word of caution: My friend Sharon had a bad experience with water-based poly which she later learned was caused by using Murphy's Oil Soap (CORRECTION: An earlier version of this post said it was Mrs. Meyer's hardwood floor cleaner – it's actually Murphy's! My B, Mrs. M). Apparently something about the cleaner interfered with the adherence of a water-based finish... super crazy and unfortunate! I almost never mop and certainly never with Mrs. Meyers, so I decided it was a non-issue for us. I'll let you know how it holds up! 
  • Thursday (Day 4): The guys applied the third (& final) coat of poly in the morning and installed new shoe moulding. We got home from work around 9pm and did our celebration dance on our new floor!
  • Weekend work: I'll be sanding & staining the newel post and handrails this weekend, as well as touching up the paint on our stair risers and caulking the new shoe moulding. Then we'll move everything back to where it belongs and share more "After" photos.

Eli and I stayed with my sister during the refinishing process...technically we could have been back in the house after the first 2 coats of poly went down, but we played it safe and waited til it was all done. One thing I was really nervous about going into the process, was security. There would be strangers in my house when I wasn't home, which is nerve-wracking for me. The guys we hired were fine and didn't give us any reason to suspect they'd steal anything (before, during or after), but we did take some precautions. Eli took his expensive camera gear to his office and we kept our laptops with us. Everything else stayed, including the TV, iMac, jewelry, etc. but other than the TV, we didn't leave anything enticing out in the open. 

The other concern was what to do with our house key. It wasn't practical for us to meet them every time they came or went because of city traffic and needing to be at work. I ended up leaving them my key, which was nerve-wracking again...what if they made copies? Or what if they forgot to lock up and someone else broke into our house? These are things I have to think about in our neighborhood where there's a decent amount of crime. Luckily we have a home security system that we can control from our phones and see whenever a door or window is opened. The floor guys called me each morning when they arrived so I could disarm the house, and then again when they left so I could arm it again. I also let my neighbors know what was going on so they could call the cops if anything seemed awry. Thankfully we didn't have any issues, but I just wanted to share what worked for us since I hadn't really considered it beforehand.

Lastly, the bill. I called around and got some quotes before deciding to go with a local company called Atlas Floors. Here's how the bill broke down:

Sand, 1 coat of stain, 3 coats of poly for main floors (309 sq.ft.) $927.00
Sand, 1 coat of stain, 3 coats of poly for stair treads (103 sq.ft.) $154.50
2nd coat of stain (309 sq.ft.) $231.75
Discount** -$100.00
Total cost $1,813.25
** I originally chose Atlas because my friend had recommended them and they were offering an Angie's List Deal. After I had them come out to measure and finalize the quote, I learned that it was a different company called Atlas that was offering the deal. Whoops. They offered me $100 discount to stick with them, and I took it. I'm still not sure which company my friend used, but it worked out in the end.

$1,800 is easily the most we've spent on anything in our house to date, but it also has had the biggest impact. I'm considering it an early birthday and Christmas present to myself. : ] And an investment in my sanity! 

So what do you guys think? Did it turn out like you expected?

Effortless Wood & Leather Picture Frame

A super easy DIY picture frame made from suede cord and wood slats

Despite the laundry room's snazzy gallery wall, the powder room's funky wallpaper, and the living room's huge set of unstyled built-ins, I still feel like most of my walls are a desolate wasteland crying for help art. I guess that's as good a sign as any that I'm no minimalist.

There are a few reasons my walls are still bare – primarily a lack of art and a lack of frames. Go figure! Owning a house has suddenly made me very picky about what I put on the walls, and the filler from old apartments won't do anymore. I'm not trying to start a highbrow art gallery here, I just want a well-appointed collection of pieces that make me smile when I pass by. Is that so much to ask??!

As it turns out, it’s really hard to find good artwork that doesn’t cost gobs and gobs of money. Hence the filler and the empty walls. And more surprisingly, it's hard to find matted frames in stores that fit what I want to hang. Hence the lucrative industry devoted to custom framing. This is all to say that I've set off on an art-gathering, frame-making mission – and I'm starting simple with this majestic Rifle Paper Co. calendar cover and a (seriously) effortless frame. (Can we call it a frame? Cuz I am.) But before we get to that, I just gotta say I am in love with all things Rifle Paper Co. right now! The colors & illustrations are so charming and girly. "Girly" isn't my usual aesthetic & a calendar cover isn't my usual idea of "art," but I love this one & it makes me smile, so up on the wall it goes!

OK, back to the frame. This beaut is ridiculously easy – there are probably thousands of them hanging in ancient caves yet to be found by archaeologists. All you need is:

  • Something you want to frame – ideally on a thicker material (like cardstock or unstretched canvas)
  • 1/4" x 3/4" flat screen moulding – the length should be 4 times the width of your image + breathing room. For me, that was about 4 feet.
  • Suede cord – you can find this at any craft or jewelry store. I recommend flat cord rather than round because it's easier to tie. The length should be about 5 or 6 times the height of your image (better to err on the longer side). For me that was about 9 feet.
  • A saw – I used an $8 miter box saw from Home Depot. This thing is a life saver.
  • Wood stain – I used leftover deck stain in Cordovan Brown, but you can get tiny test pots of interior stain for $3 or $4
  • Paint/stain brush
  • Scotch tape
Step 1 is to measure the length of wood needed for tops and bottoms of this simple frame.

Step 1: Measure your first cut

I carefully tore this cover off my calendar and started by laying the wood across the top. I eyeballed the width, leaving about an inch of wood overhang on each side to give me space for my leather ties. I didn’t need that much space, but I like having the flexibility to swap in larger artwork down the line. If you prefer a more precise fit, a half inch would likely work.

I cut the wood for this simple frame using a miter box back saw set, found at Home Depot for $15

Step 2: Cut 4 wood slats

I used a miter box saw to make my cuts – to clarify, that's the yellow contraption with the slits in it & the back saw. We have 3 power saws in the house, but this school-bus-lookin'-get-up is ideal for accurately cutting trim & moulding. The bottom of the box has a lip that hugs the edge of the table, making it easy to keep it straight. Then you just slide in the wood, brace it against the side of the box and saw away. It takes a little more elbow grease than a power saw, but you reap what you sow. A precise, square edge! I used the wood from my first cut to measure three more – giving me 4 total.

I stained the wood using leftover Behr Deck Waterproofing Stain to get a rich brown color

Step 3: Stain the wood

This is totally optional, but I prefer a warm brown tone over the raw pine. I used leftover deck stain, which isn't ideal for this type of project because it's got a different consistency for weatherproofing. Ideally I would have had a small test pot of interior wood stain on hand, but  #rockwhatyagot! I laid my wood out on a paper grocery bag, brushed on the stain, let it sit for a few minutes, and then wiped it off with a paper towel. I did this a couple times, letting it dry for a few minutes in between coats, to layer on more color until I got the richness I wanted. I only stained the fronts & sides of the wood – not the back – and I let it dry overnight so as not to accidentally stain my picture.

Attach the wood to the picture with some scotch tape and leather cord

Step 4: Assemble the pieces

Once the wood dried, I laid a piece face down and lined the top of my picture to be just below the top edge of the wood and horizontally centered. Once it was positioned, I used a couple small pieces of scotch tape to keep it in place. This saved me the headache of having it shift around while attaching the other pieces. Then I lined up a second piece of wood on top to make a picture sandwich and broke out the suede cord to tie it all together.

I used suede cord to fasten the wood slats around my picture.

Starting on one side, I tightly wrapped the cord around both pieces of wood a couple times and made a knot. Then I gave the cord enough slack to hang from and knotted the other side the same way. I put my knots as close to the paper as I could to ensure a really tight grip on it. This sucker is locked doowwwwwwn. (Said like Will Smith in Hitch after he drank too much Benadryl)

My plan was to cut the cord after each knot, but plans are boring – I like to shake it up! While I was laying everything out I realized I liked the look of leather running down the sides to visually complete the “frame.” It makes it look more meaty & modern, less like an ancient scroll that may disintegrate at any moment.

I placed the bottom two pieces of wood just like I did with the top – taping the picture to the base and then lining up the front piece. I ran the cord down the length of the picture, wrapped it around the bottom pieces of wood a couple times and tied a knot. Then I ran the cord back up, wrapped it once again and tied another knot. I didn't do any fancy sort of knots – just whatever got the job done. Remember, effortless is the name of the game here. The only tricky bit in this entire project was making sure these side cords weren’t tied too short (making the paper billow) or too long (lookin' like a dangled mess). I found the easiest way to test the length was to gently pull the top and bottom pieces of wood in opposite directions, fully extending the picture. *clears throat* I mean, I ran it through my gravity simulator and computed the results to 1/1000000000th of a micron thus fully accounting for the Earth's rotational effects on the last Monday of the 11th month of 2014 and the fibers and #science.... right. So we're clear now... moving on!

A close up of how I knotted the suede leather cord

My suede cord came in 2-yard increments, which was enough to tie the tops and one side. I started with a fresh piece of rope for the other side, knotting it at the top, repeating the process of running it down the side, tying it at the bottom, and running it back up. Above is a close up of the knot on that second side. Super precise, right? And ba-da-bing-ba-da-boom! Finito!

An effortless suede & wood frame DIY

I love when things that look effortless actually are effortless. Unlike my messy-but-not-too-messy "bedhead" today. I did this entire project one night after work (+ some drying time for the stain), and now my "items to hang" pile is one piece shorter. Phew!

What's your process like for hanging things on the wall? Do you just put up whatever you have on hand or meticulously collect and plan every last nail? Would a calendar cover make the cut in your house? That last question is a trap... ;) 

Show Me Sand the Floor... Show Me Stain the Deck

Last weekend Eli & I finally got a few dry days to stain the deck and it turned out to be quite the task! Eli took a timelapse of the whole process and while it looks easy peasy in hyperspeed, just know that it took enough time (& photos) to burn through 3 memory cards & 4 camera batteries! Take a look...

Halfway into the first coat I was feeling like Daniel-san in Karate Kid... you know, when he thinks he's almost done & then realizes he's no where close.

Our deck was newly built before we bought the house & it was one of the biggest selling points for us. Our last apartment was beautiful & modern but had virtually nowhere to hang out outside. We started feeling (and looking) like vampires who never saw the sun. Now that we have a deck, we practically live out there. It's where we hang out with friends, chat with our neighbors, drink coffee, eat dinner.... I'd sleep out there if mosquitos weren't a thing. In short, it's our favorite place. It's time to make it look as great as it feels.

Because the deck was built with new pressure-treated wood, we had to give it some time to acclimate before we could stain and seal it... I'm fairly confident the last year & a half was sufficient! Sure, we didn't need to wait that long, but we were having too much fun to take it out of commission during all the great weather. Now time is forcing our hand and it's a race against the clock (I told you!) The deck spent a lot of time under snow last year, so we gotta protect it before another winter swoops in to wreak havoc!

I fully expected staining the deck to be a weekend project but before we knew it it was Thursday morning & we were still at it. #CantStopWontStop In reality a majority of that time was waiting for stuff to dry & then waiting out the rain & then waiting for stuff to dry again. Let's hope we learned our lesson to start early!

Saturday morning we went to Home Depot to pick up supplies...

We used Behr Premium deck cleaner and stain

... and $150 later we hunkered down and got to work. 

Step 1: Clear off the deck

This was a great excuse to get rid of all the junk that had accumulated over the last 16 months. We don't have a garage or shed, but we still have lawn care tools, grass seed, wood scraps, etc. Without a good place to store all that stuff, our deck turned into an accidental open-air shed, and it was not a good look. Our favorite place shouldn't be an eyesore! Once all the stuff was gone & we'd swept, we were surprised by how big the space felt again. Note to self: must find a long-term outdoor storage solution.

Step 2: Deep cleaning

Before we could start applying any stain, we had to give the wood a thorough refresh & try to lift bike grease spots & other battle wounds our deck had collected over the year. We followed the directions on the bottle and hosed everything down with water. Then we diluted the cleaning solution in the pump sprayer with one part water to one part cleaner and sprayed our mixture all over the wood.  I wore gloves, close-toed shoes & glasses to protect my skin & eyes from the spray.

Step 2: Spray Behr Premium all-in-one wood cleaner over the deck
Use a pump sprayer to apply the cleaning solution

After I'd sprayed all the posts, railings & boards, I poured some of the undiluted cleaner directly onto the grease stains in hopes that it would lighten them better. I let it sit for about 15 minutes to do its thang and then scrubbed the whole deck with a stiff-bristle deck brush – really laying into the dark spots. Then I wasedh it all away. It did a pretty good job brightening the wood & the bike grease was less noticeable (though not gone altogether). The scrubbing and rinsing took longer than I expected – keen observers may have noticed it was absent from the timelapse. That's because it got dark before I finished & we drained the first camera battery! Whoops! 

Step 3: Let the deck dry completely

The wood has to be 100% dry before you can apply any sort of sealant. I went to bed nervous on Saturday night that it wouldn't be dry enough for us to stain on Sunday since I didn't finish rinsing til after 8 o'clock. Luckily Sunday was living up to its name & our south-facing deck was totally dry by about 1:30pm.

Step 4:  Apply first coat of stain

Eli and I each grabbed a brush and set out to divide and conquer. First target: rails & posts. I squeezed between the fence & our deck to get the outside edges while E focused on the inside faces that we'd actually see everyday. I felt like a contortionist bending every which way to get the bottoms of boards because we aimed to coat all six sides of every piece of wood. Woof. I felt like an old lady that night – my lower back was killing me! We were really surprised by how much stain it took just to do the railings! About a half gallon for the first coat. We forgot to factor them in to our square footage calculation when deciding how much stain to buy, so Eli had to run back to Home Depot to get another gallon.

Meanwhile, I started on the floorboards. I used an applicator pad that screwed onto my broomstick & took it slow-n-steady. Because I was applying a thin coat, the stain dried pretty fast & I had to be careful not to overlap too much where I'd already applied because each pass would make it darker. I took it one board at a time – sometimes two – going from one end all the way to the other end. The directions on the can advised doing it this way so that the boards would have a consistent coloring and the whole deck wouldn't look patchy. 

We used the Shur-Line applicator pad to apply stain to the deck's floorboards

My applicator pad had a built-in "groove tool" that you could extend down, and it was supposed to get the cracks and boards in one fell swoop. Sounds great in theory, less so in practice. It was awkward to flip the tool down, difficult to dip it AND the pad into the stain, and even when I could do all that it simply wasn't very effective. The cracks were either too wide for the groove to reach the edges, or too narrow for the groove to fit at all. I gave up trying after the first couple boards – you can see the cracks are bare in the shot above. It's best to have a second person follow behind you to get those with a paint brush and to brush away any pooling stain. The applicator pad is pretty good at spreading stain evenly so it doesn't pool, but putting it down and picking it up from the wood leaves visible marks that you have to brush away.

Step 5: Apply second coat of stain

Behr's stain is supposed to dry for a couple hours before you start a second coat, but we were losing daylight fast. Staining is not one of those activities I like doing by porch light, so we called it a night & hoped to find time to finish during the week. Of course, there were a few torrential rain storms that really screwed up scheduling (& necessitated another Home Depot trip to get a huge tarp) but we finally got back to work Wednesday (for rails/posts) & Thursday (for floorboards). The second coat of stain goes a little faster than the first – especially because it's supposed to be suuuper thin. 

our deck stained in Cordovan Brown

Step 6: Wait for it to cure

Behr recommends waiting 72 hours for the stain to fully cure before replacing furniture, etc. We just finished staining yesterday, so we're still in the waiting period. Aaaaand it's raining again – let's hope this "weatherproofer" really works! The rain droplets look like they're beading up rather than soaking in, so that's a good sign. 

Strictly speaking looks, I really like the darker wood. I choose to go dark because we learned early on that we were prone to stains (hello, bike grease) – so we wanted to be able to camouflage those and not have to worry about actually using our deck. Pay no mind to our gardenia that was murdered by a groundhog or the overzealous citronella plant ... nothing to see there! I mentioned earlier that we would stain the AC cover Eli built from a bed frame when we did the deck – but as you see it's glaringly absent in the "after" photo. We quickly realized we didn't have enough space or time to do both at once – there was no where for us to rest the cover without killing the grass. After the deck is fully cured & our arms fully functioning again we'll tackle that.

In the meantime I'm brainstorming ideas for how to style it up. I can't wait to get my favorite room back!

This post was not sponsored in any way, I'm just a girl on a mission.